This Harvest Wheat Sheaf recipe makes a festive loaf to display on your Fall table. Made with a portion of sprouted wheat berries, it’s an edible and fun Fall project.

I’ve really been enjoying Fall this year. The colors have been so vibrant and beautiful that I’ve just been in awe. The Harvest Moon was particularly awesome this year and it inspired me to create this festive Harvest Wheat Sheaf.
This bread is really easy to make, but it does take a few days from start to finish because of the extra time needed to sprout the wheat grains. Don’t let that discourage you. It’s a truly beautiful and festive bread that is worth the extra time.
Did you know that …
“For thousands of years the survival and power of a tribe or country depended on its stocks in grain. Harvesting, processing, and storing grain stocks was of huge importance, and war was declared only after harvest…One of the earliest records of large-scale food preserving was in ancient Egypt, where it was enormously important to create adequate stocks of dried grain to insure against the failure of the Nile to flood seasonally. Huge quantities of grain were stored in sealed silo, where they could be kept for several years if necessary. Records from 2600 B.C. show that the annual flooding of the Nile produced surpluses of grain that were stored and kept to feed builders of irrigation schemes and pyramid tombs. The Great Pyramid of Cheops at Giza was built around 2900 B.C. by slaves fed with stores of grain and chickpeas, onions, and garlic.”
— Pickled, Potted and Canned: How the Art and Science of Food Processing Changed the World, Sue Shepard [Simon & Schuster:New York] 2000 (p. 51)
Source: The Food Timeline http://www.foodtimeline.org/foodfaq3.html
This bread is edible, but I wouldn’t let anybody eat it right away. I froze it to save for Thanksgiving. It would make a great centerpiece, but my family will probably want to eat it. Families are like that you know.

Harvest Wheat Sheaf Recipe with Sprouted Wheat
Makes: 1 Wheat Sheaf
You might also enjoy a harvest wheat recipe made without sprouted grains.
Ingredients:
- 2 to 2-1/2 cups all-purpose flour
- 1 cup whole wheat flour
- 1/4 cup + 2 tablespoons sprouted wheat*
- 2 tablespoons wheat germ
- 1 envelope instant yeast
- 1 teaspoon salt
- 3/4 cup milk
- 1/4 cup water
- 3 tablespoons vegetable oil
- 1 tablespoon honey
- 1 tablespoon light molasses
- Egg Glaze (Combine 1 egg and 1 tablespoon water. Stir to blend.)
* Sprouting the Wheat Kernels:
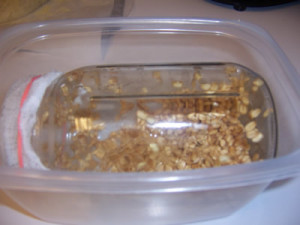
Place 1/4 cup kernels in a quart-size mason jar (or other container) and cover it with cheesecloth. Pour water through the cheesecloth to moisten the grains, drain and place the jar in a dark cabinet for a few days. You might want to place the jar in a container so that the water doesn’t leak everywhere.
Keep the jar in the cabinet until 1/8 to 1/4-inch sprouts appear, about 2 days. Keep kernels moist by occasionally pouring on and draining off water.
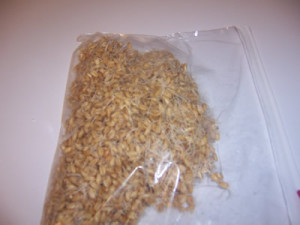
Use as soon as sprouts appear and before sprouts turn green. Any extra sprouts can be used as garnishes, in salads, casseroles, quick breads, and other yeast breads.
To store sprouts, refrigerate in a firm, air-tight container (or a zip lock bag) for a few days to over a week. I stored my sprouts in the refrigerator for about 3 days until I was ready to bake the sheaf.

Making the Wheat Sheaf:
In a large bowl, combine 2/3 cup all-purpose flour, wheat flour, sprouted wheat, wheat germ, undissolved yeast, and salt.
Heat milk, water, vegetable oil, honey and molasses until very warm (120o to 130oF). Gradually add to flour mixture. Beat 2 minutes at medium speed of electric mixer, scraping bowl occasionally. Stir in enough remaining flour to make a soft dough.
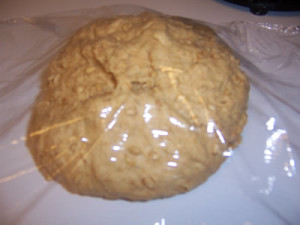
Knead on lightly floured surface until smooth and elastic, about 8 to 10 minutes. Cover; let rest 10 minutes.
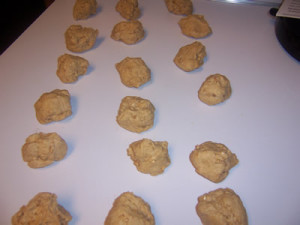
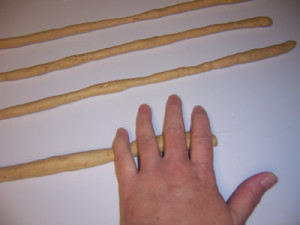
Divide dough into 18 equal pieces. Roll 2 pieces to 12-inch ropes. Twist ropes together; set aside.
Roll 8 pieces to 18-inch ropes and roll remaining 8 pieces to 15-inch ropes. While you’re making the ropes, cover the other dough balls with plastic wrap so they don’t dry out.
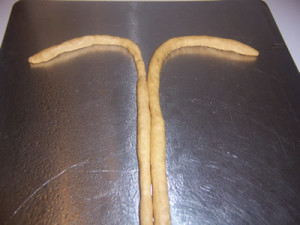
Place one 18-inch rope lengthwise on center of a greased baking sheet, bending top third of rope off to the left at a 45-degree angle.
Place a second 18-inch rope on sheet touching the first rope but bending the top third off to the right.
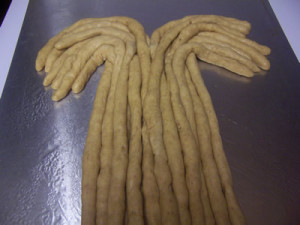
Repeat procedure using two more 18-inch ropes placing them along outer edges of straight section and inside bent sections so that ropes are touching.
Repeat, using two of the 15-inch ropes. Repeat, starting with the long ropes placing them on top of the arranged long ropes and slightly spreading out ropes forming bottom of sheaf. Fill in by topping with the remaining 15-inch ropes making shorter bends in the two uppermost ropes.
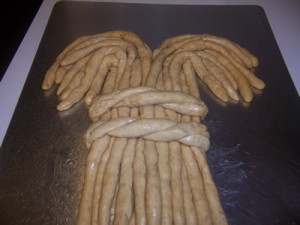
Cut twist in half. Arrange twists side by side around center of sheaf; tuck ends underneath.
Cover sheaf; let rise in warm, draft-free place until doubled in size, about 1 hour.
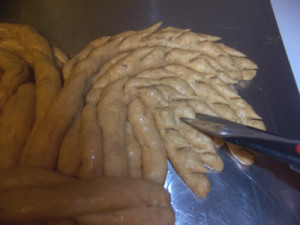
Make diagonal snips with scissors along the bent portion of “stalks” above the twist. Gently brush with Egg Glaze.
Bake at 400 degrees F for 15 to 20 minutes or until evenly golden.
Remove from sheet; cool on wire rack.

Now, it’s time to enjoy the beautiful wheat sheaf.

This harvest wheat sheaf has been submitted to the YeastSpotting bread roundup hosted by Wild Yeast.
Happy Baking!
Cathy
Very cool Cathy! I’ve always wanted to try this and now I have a step-by-step to help out.
Thanks Michelle! I had a lot of fun making it.
So pretty! I would want to keep it forever too…
Thanks MC! I know I just couldn’t bring myself to eat it. 🙂
That bread is stunning! Good job!
Holy cow, that’s totally amazing!
Thanks Mimi and Amanda! It was really fun making it!
Cathy, What a beautiful bread. Your step by step instructions are perfect for really being able to make this at home. I think I’ll do this for Thanksgiving! Thank you.
Thanks Christie! I think you should make it for Thanksgiving. Let me know how it goes…
That is absolutely gorgeous! I’ve bookmarked this for reference later.
Thanks Mary J. This one was fun to make. Lol…I still have it in my freezer.
Love the art! – Susan