And so we begin our bread-baking journey through the Healthy Bread in Five Minutes book. For the first official bread bake or bread braid as it is affectionately referred to, we’ll be making breads using the master dough. Since it’s the new year and all, I just really wanted to make a healthy loaf of bread. Nothing fancy, just a loaf of whole wheat (or almost whole wheat) bread that I could use for sandwiches and toast.
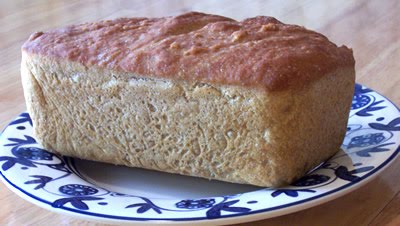
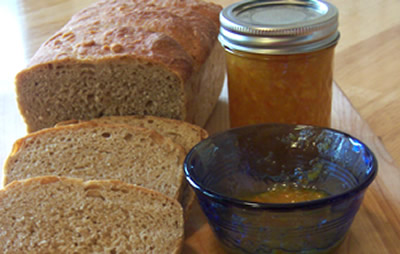
I decided to use the master dough to make the Hearty Whole Wheat Sandwich Loaf rather than the free-form artisan loaf. However, I did use the steam pan under the loaf pan to achieve the crispy crust. The result was a beautiful artisan loaf of bread that my family has been enjoying as toasted cheese sandwiches (along with homemade soup) and toast with delicious homemade tangerine marmalade.
Look for the Healthy Bread in Five Minutes Master Recipe here.
Making the master dough
The master dough recipe makes enough dough for four 1-pound loaves. I used two pounds for this loaf. The rest of the dough will be used to make some other breads.
Measure and whisk together the dry ingredients in a 5-quart bowl, or a resealable, lidded (not airtight) plastic container. For the flour, I used a mixture of whole wheat and white whole wheat (rather than all whole wheat), and all-purpose flour.
Add the liquids to the dry ingredients. You can use a wooden spoon but I like to use my Danish dough whisk for this step. It only takes a matter of minutes so you don’t need to mess up your food processor or stand mixer unless you just want to.
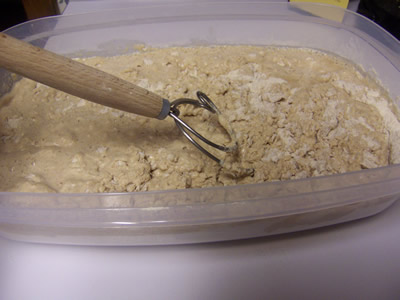
The dough should be wet and remain loose enough to conform to the shape of the container.
Cover the dough with a lid (or plastic wrap if using a bowl) and allow it to rise on the counter at room temperature for about 2 hours or until it collapses or flattens on top. I used a flat plastic container so it would fit on the bottom shelf of my refrigerator. I put the lid on but left it open a crack so the gases in the yeast could escape.
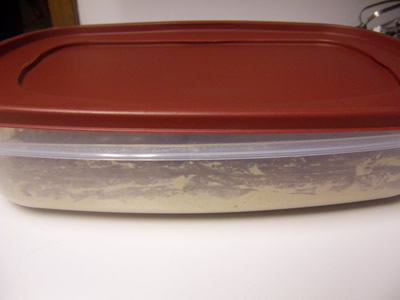
After the dough flattens, refrigerate it overnight and use it over the next 14 days.
When you’re ready to bake the loaf:
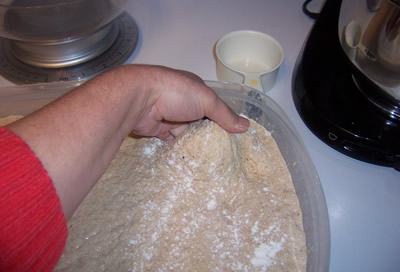
Lightly grease an 8 1/2 x 4 1/2-inch nonstick loaf pan. My nonstick loaf pans are the larger size so I used a glass loaf pan instead. Remove the dough from the refrigerator and dust the surface of the dough with flour.
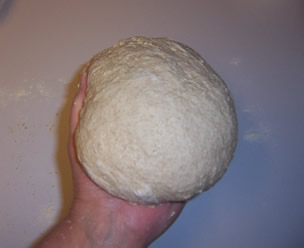
Cut off a 2-pound piece and dust it with more flour, then shape it into a ball and let it rest a moment before continuing to shape it.
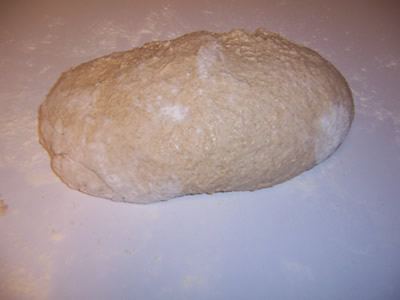
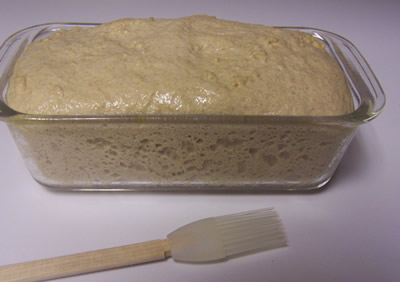
Elongate the ball into an oval shape and place it in the loaf pan with the seam side down. It should fill the pan about three-quarters full.
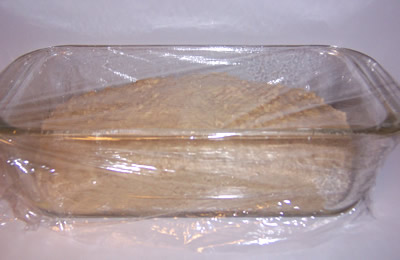
I love this part! Just elongate the ball and place it in the pan. How easy is that! Cover the pan loosely with plastic wrap and let it rise at room temperature for about an hour and 45 minutes. Or longer if it’s cold in your kitchen like it is in mine these days.
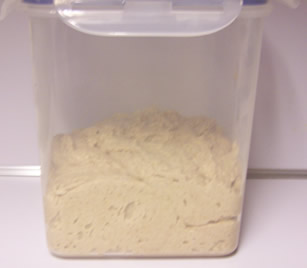
At this point, I put the rest of the dough back in the refrigerator. As you can see, I switched containers. You can leave it in the same container for 14 days but I had removed two pounds so I didn’t need as big of a container.
Preheat the oven to 350 degrees and place an empty broiler tray on the lowest rack to act as a steam pan. I almost omitted this step since I was baking the bread in a loaf pan but I decided to try it anyway. I’m glad I did. The crust turned out wonderful.
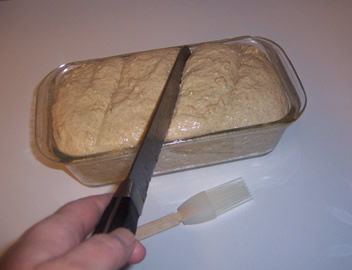
Right before you bake the bread, brush the loaf with water.
Then slash the top diagonally with 1/4-inch-deep parallel cuts, using a serrated knife. I have a lame but I’ve found that using a serrated knife works better for me.
Place the loaf on the center rack of the oven and pour 1 cup of hot tap water in the steam pan. Quickly close the door so you don’t let the steam escape. Bake the loaf for about 40 to 45 minutes, or until brown and firm.
I was a little bit worried about being able to remove the loaf from the glass pan eventhough I had sprayed it with cooking spray. So, I let the loaf cool in the pan for 10 minutes, then went around the edges using a spatula. It worked like a charm.
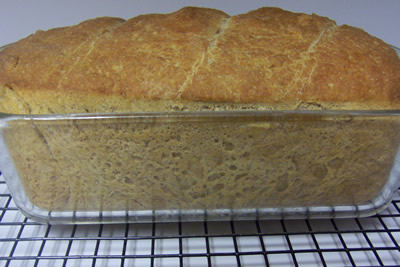
Then, I removed the loaf from the pan and allowed it to cool completely on a wire rack. Now it’s ready for slicing and eating.
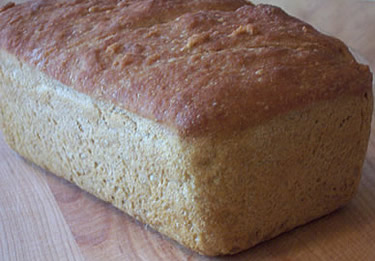
I had my first slice with tangerine marmalade. I didn’t even toast it. Tasted great!
I also had some with peanut butter and jam and made a toasted cheese sandwich and an egg and cheese sandwich. It’s a very tasty and versatile bread. I would offer you some, but it’s almost gone as you can imagine.

More about the HBinFive Baking Group
The HBinFive baking group, started by Michelle of Big Black Dogs, is baking through all of the breads in the Healthy Bread in Five Minutes book. For more information on the new HBinFive baking group, check out Michelle’s blog.
Thanks for joining us today in the bread-baking blog. Look for more breads from the Healthy Bread in Five Minutes Baking Group. If you want more info on the HBinFive baking group, click here
Happy Baking!
Cathy
Great pics! I see you are using a very shallow container at first. Do you think it makes any difference in the initial rise? Just curious!
Thanks Ezzie! I’m not sure if the shallow container makes any difference in the rise but it sure makes it easy to mix up the dough.
Gorgeous crumb! I also like to bake my breads in loaf pans, especially glass pans. You always get a good rise and perfect for sandwiches too!
Thanks Michelle! This loaf was perfect for sandwiches and the rise was beautiful!
I haven’t tried the sandwich recipe yet, so happy to see it done here by an expert. It looks beautiful. Your crumb looks perfect. Did you store this dough or cook it up quickly?
I loved this dough as sandwich bread. After the Holidays I was just craving whole wheat sandwich bread.
I stored the dough for a couple of days for the lst batch and a little over a week for the 2nd batch. I think it fares better when you make it right after you mix it up though.
The very thought of tangerine marmalade is making me drool 😀 That sounds absolutely delicious! Great photos and tutorial as well! I still have some dough left and I think I’ll use form a loaf in a pan like yours.
Hi Kim! The tangerine marmalade is delicious and easy! I think you should try the bread in the loaf pan. It’s really good, especially toasted with that delicious marmalade.
Thanks for all your great pictures. I really like to make it in a loaf pan too – so easy and then we can use if for everything.
I haven’t tried a loaf pan yet but I see yours turned out beautifully! I never thought of putting the rest of my dough in a smaller container either – great tip for saving space in the frig.
Thanks Raelyn and Susan! I really enjoyed the sandwich loaf. It was great for toasting.
i can almost TASTE your loaf! looks fantastic!!
I tried the loaf like that but it came out too dense. I need to give it another go. Yours looks great!
oh that loaf of bread is just gorgeous! fantastic job!
Thanks Ladies! I used 1/2 whole wheat and 1/2 white whole wheat so it wasn’t as dense as all whole wheat would be.
Wow, just beautiful bread! I will have to check out the marmalade.
It’s good to know you can get the glass pans to work if you let the bread sit awhile! I went out and bought nonstick pans. Would love to use my glass pans also–a different size.
Thanks Judy! I enjoy using my glass pans as well. It made the crust taste wonderful!
I have that same container with the red top! I bought mine so that the stored dough fit better in my little auxiliary fridge in the garage. I’ve also ordered a dough whisk – can’t wait till it arrives!
I like that container because it fits on the bottom shelf of my refrigerator, but I usually switch containers after I take out the first portion.
You’ll like the dough whisk. It definitely makes things easier.
Hi Cathy ,i can’t seem to find the recipe for this lovely bread?
Hello, if you click on the link “Look for the Healthy Bread in Five Minutes Master Recipe here” link above the Making the Master Dough headline, it will take you to the Artisan Bread in Five Min site where you’ll find the recipe posted. I just checked and the recipe is still there. Happy Baking!