Description
This white bread with poolish is based on the Forkish method from Flour, Water, Salt & Yeast and is baked in a Dutch Oven Combo Baker.
Ingredients
Poolish:
250 g (1 7/8 cups +1 tbsp.) white bread flour
250 g (1 1/8 cups) water, 80 degrees F.
0.4 g (scant 1/8 tsp.) instant dried yeast
Final Dough:
250 g (1 7/8 cups + 1 tbsp.) white bread flour
125 g (1/2 cup) water, 105 degrees F.
10 g (~1 3/4 tsp.) fine sea salt
1.6 g (1/2 tsp.) instant dried yeast
500 g Poolish, all of the above
Instructions
1) Make the Poolish
The night before you plan to bake the bread, whisk the flour and yeast together in a large bowl and add the water. Mix by hand or with a wooden spoon until it is thoroughly blended. Cover the bowl with plastic wrap and let it sit at room temperature (65 to 70 degrees F.) for 12 to 14 hours. When the poolish is ready, it should be bubbly and almost tripled in volume.
2) Mix the Final Dough
The next day, after the poolish is fully mature, whisk together the flour, salt, and instant yeast in a large bowl. Pour the water around the edges of the poolish to loosen it from the bowl. Pour the water/poolish mixture into the flour mixture.
For the next part, you’ll need to get your hands wet. Using wet hands, mix the dough by folding it to thoroughly incorporate all of the ingredients (refer to my post on making Tartine Country Bread). The dough should be around 74 – 75 degrees F.
3) Bulk Fermentation
Let the dough rest for 2 to 3 hours after mixing. During this time, do two or three folds during the first hour after mixing the dough. I forgot to use 105 degrees F. water when I mixed the dough, so I extended the bulk fermentation another hour to compensate for the overall temperature of the dough being lower. I did several folds and turns during the first hour, then I let the dough rest for the remainder of the proof.
4) Shaping the loaf
Mr. Forkish has a slightly different process because he bakes his loaf in a Dutch oven and shapes his loaves into a fendue shape. I shaped my loaf differently and baked it in my combo baker, so this is the process I used. If you choose to use a different type of bread baker, you might need to adjust the shaping/scoring part so you don’t burn yourself when inverting the dough into the pot.
I only made one loaf, so I didn’t need to divide the dough. I just carefully scraped the dough onto a lightly floured surface and shaped it into a medium-tight ball. Then I placed it seam-side up in a floured banneton basket. I used an 8-inch round proofing basket, but you could use a larger one if desired.
5) Proof the loaf
I lightly floured the top of the loaf and covered it with a kitchen towel. Then I let the loaf proof in the basket for an hour.
Use the finger-dent test to know when the dough is fully proofed and ready to bake. This just means you press your index finger lightly into the dough, and if the indentation remains, the dough is ready.
6) Prepare the oven for Hearth baking
While the loaf is proofing, at least 45 minutes before it’s time to bake, preheat the oven to 475 degrees F. with the combo baker, Dutch oven, or other bread baker on the bottom rack. There’s no need to place a steam pan underneath. The covered pot will provide the steam.
7) Scoring the loaf
For this part, be very careful not to burn yourself because you’ll be working with a very hot pan. Keep your fingers, forearms, and anything else away from the hot pot. A large heat-resistant oven mitt works wonders.
Carefully remove the preheated combo baker (using gloves) and invert the proofed loaf onto the bottom of the baker. My loaf didn’t plop exactly in the center of the pan, so I shook the pot to even it out, but it was still a bit uneven.
Then I carefully scored the loaf using a lame. Even though the rings of flour were a bit off in the pan, I thought the scoring turned out pretty well.
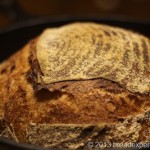
8) Bake the loaf
Cover the combo baker with the lid and place it on the bottom rack to bake. Bake the loaf for 30 minutes, then uncover the combo baker, and bake for an additional 20 to 30 minutes. This is what the loaf looked like when I removed the lid.
The finished loaf should be at least medium-dark brown all around the loaf. This has always been the hard part for me because I don’t like to burn my bread, but I was a good girl and left the loaf in for the suggested amount of time. However, if your oven is hot like mine, you might want to check the loaf sooner.
9) Cool the Loaf
Carefully remove the combo baker from the oven and gently tilt it to remove the loaf. I just reached in using my oven mitt and lifted it out. Place the loaf on a wire rack and let it rest for at least 20 minutes before slicing.
Notes
Adapted from: Flour Water Salt Yeast: The Fundamentals of Artisan Bread and Pizza by Ken Forkish
- Category: Bread
- Method: Yeast
- Cuisine: French