For Day 16 of the Bread Baker’s Apprentice Challenge, we made Kaiser Rolls. Like several of the other formulas in the book, this version utilizes a Pâte Fermentée to improve flavor, texture, and color. It also utilizes diastatic malt powder to improve coloring.
When I was making the Pâte Fermentée (the day before I baked the bread), my son asked if we had any Kaiser Rolls to make a sandwich. I said, “funny you should ask, I’m making them for the BBA Challenge tomorrow”. He had to wait a day for his rolls, but it was worth it. He likes them.

I decided to use freshly milled organic wheat flour because I ran out of store bought bread flour and it seemed rather silly to go out and buy more when I have a bunch of stored grains. I also used diastatic malt powder made from sprouted wheat grains. The formula calls for diastatic barley malt powder, but I didn’t have any barley grains so I used wheat grains to make the diastatic malt powder. I’m going to try sprouting some barley grains soon. I plan on making these rolls again so I’ll use the barley malt and let you know how it compares to this version.
You might also enjoy these other Roll Recipes.
Kaiser Rolls
Makes: 6 large rolls or 9 smaller rolls (I doubled the recipe)
Ingredients:
- 1 1/2 cups (8 ounces) pâte fermentée
- 2 1/4 cups (10 ounces) unbleached bread flour
- 3/4 teaspoon plus a pinch (.2 ounce) salt
- 1 teaspoon (.17 ounce) diastatic barley malt power
- or 1 1/2 teaspoons (.33 ounce) barley malt syrup
- 1 teaspoon (.11 ounce) instant yeast
- 1 large egg, slightly beaten
- 1 1/2 tablespoons (.75 ounce) vegetable oil
- 10 tablespoons to 3/4 cup (5 to 6 ounces) water, lukewarm
- Poppy or sesame seeds for topping (optional)
- Semolina flour or cornmeal for dusting
Directions:
Using Freshly Milled Flour
You only use half of the pâte fermentée in this recipe so you can use the other half for a different bread or make a double batch of kaiser rolls. I decided to make a double batch of kaiser rolls.
Stir together the flours (bread flour and all-purpose flour) and the salt, and yeast in a bowl with a wooden spoon (or you can use your stand mixer if you prefer). I’m doing as many of these breads by hand as I can to get the artisan experience. Add 3/4 cup of the water
Stir until everything comes together and makes a coarse ball. Adjust the flour or water as necessary to ensure the dough is neither too sticky nor too stiff. I switched to the Danish dough whisk when the dough got too stiff to mix with the wooden spoon.
Transfer the dough to a counter sprinkled with flour. Knead the dough until it is soft and pliable, tacky but not sticky. About 4 to 6 minutes by hand.
As you can see from the photo above, the dough was a little too sticky so I sprinkled more flour and continued kneading a while longer.
Transfer the dough to a lightly oiled bowl and roll it around to coat it with the oil. Cover the bowl with plastic wrap and let it ferment at room temperature for an hour.
or until it swells to 1 1/2 times its original size.
Remove the dough from the bowl and knead it lightly to degas it.
Then return it to the bowl and recover with plastic wrap. Place the bowl in the refrigerator overnight. It will keep in the refrigerator for 3 days, or you can freeze it in an airtight plastic bag for up to 3 months. I kept mine in the refrigerator for a day and a half until it was time to bake.
Remove the Pâte Fermentée from the refrigerator 1 hour before making the dough. Cut it into about 10 small pieces with a pastry scraper. Cover the dough with plastic wrap and let it sit on the counter for an hour to take off the chill.
Stir together the flour, salt, malt powder, and yeast in a bowl. Add the Pâte Fermentée, egg, oil, and 10 tablespoons of water. Stir until the ingredients form a ball. Add the remaining 2 tablespoons of water if necessary.
Transfer the dough to a lightly floured counter and begin kneading. Knead for about 10 minutes and add flour as necessary to form a dough that is soft and supple, tacky but not sticky. The dough is finally tacky but not sticky. It’s time to move on!
Transfer the dough to a lightly oil large bowl and roll it around to coat it with oil. Cover the bowl with plastic wrap to begin the fermentation. Let the dough ferment at room temperature for 2 hours, or until the dough doubles in size.
If it doubles in size before 2 hours, knead it lightly to degas and let it rise again, covered, until it doubles from the original size.
My dough doubled in size after an hour so I degased it and let it rise another hour. The dough after rising another hour.
Remove the dough from the bowl and divide it into 6 to 9 equal pieces. Form the pieces into rolls (page 82). Since I doubled the recipe, I divided the dough into a baker’s dozen pieces.
Shape the pieces into ball
Spray the counter with water. Then, place the pieces in the palm your hand. Roll the pieces around on the wet counter to create friction and shape them into balls.
That was fun! Now we have thirteen dough balls that need to rest on the counter. Mist the rounds with spray oil, cover with plastic wrap, and let them relax for 10 minutes.
Here are the dough balls after resting on the counter for 10 minutes.
Prepare a baking sheet with parchment paper, lightly mist it with spray oil and then dust it with cornmeal.
Prepare the individual rolls by cutting them with a Kaiser roll cutter or knotting them as shown on page 82. Since I don’t have a Kaiser roll cutter, I decided to use the knotted method.
Start by rolling out each ball into a long strand.
Then tie a simple knot as shown in the next 2 photos.
Then, loop the two ends through the center a second time. One end should go down through the loop and the other will come up through the loop, leaving a small nub in the center.
It took me a few tries to get the hang of tying the knots. I kept tying and untying the knots and rolling the dough back into balls and starting over again until the knots looked right. It’s not really hard, it just takes a little practice.
Place the rolls, fold side down, on the parchment, mist them lightly with oil, and cover loosely with plastic wrap.
Proof the rolls for 45 minutes at room temperature, then flip them over so the folded side is facing up. Mist them with spray oil again, cover and let them continue proofing for another 30 to 45 minutes, or until the rolls are doubled in size.
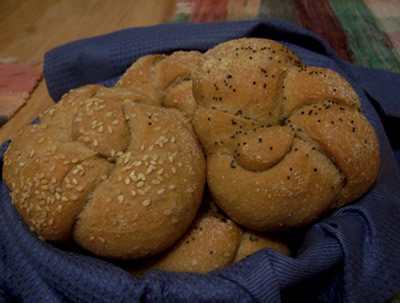
Place the oven rack on the middle shelf and preheat the oven to 450 degrees F. Uncover the rolls, and prepare them for baking. Mist them with water and sprinkle poppy seeds and sesame seeds over the top. I sprinkled about half with poppy seeds and the other half with sesame seeds
Place the pan in the oven and spray the oven walls with water, and close the door. After 10 minutes, rotate the pan for even baking and lower the oven setting to 400 degrees F. Continue baking until the rolls are a medium golden brown, about 15 to 30 minutes for large rolls.
Cooling the Rolls
Remove the rolls from the pan and transfer to a cooling rack. Wait at least 30 minutes before serving.
Now it’s time to eat! This is the ham and cheese sandwich I made for my son. I even forgot to put mustard on the rolls, but he still thoroughly enjoyed it! So I made a sandwich for me too!

Happy Baking!
Cathy


Leave a Reply