Sangak, also known as Persian Pebble Bread or Persian Army Bread, is a flatbread usually made with whole meal flour, and baked on a bed of hot stones.

Wild Naan Sangak is the bread of the month for the Bread Baking Babes. Elizabeth of blog from Our Kitchen, the host kitchen this month, has been enjoying “Persian-style” dinners recently so she decided we needed to experience some Persian bread.
Breads. From the Hearth.
Coincidentally, after Elizabeth chose this bread, but before I made it, I attended a workshop on “Breads from the Hearth.” The workshop was part of the virtual Kneading Conference sponsored by the Maine Grain Alliance.
In this workshop, Michael Hanson & Evan Orloff demonstrated how to make flatbreads in a wood-fired oven. One of the breads they demonstrated was Sangak. Michael referred to it as Persian Army Bread and gave us his interpretation of how the Persian Army would have baked this bread.
“As the story goes, every soldier would carry 2 or 3 stones in his pocket and when the army camped for the night, each soldier would take their stones and put them in a big pile in a pit. They would build a massive fire on top of the stones and let it heat for a couple of hours, then brush off the embers. Then, the baker would throw the flatbread onto the hot stones. They were able to cook for 3 to 4 hours on the hot stones.” Michael Hanson

According to Michael’s workshop bio, he is a third-generation Master Baker. He’s had a very successful baking career in the UK and has conducted research in Turkey, Bulgaria, Italy, and most recently in the Republic of Georgia where he has been exploring almost-extinct ancient grains and learning from traditional bakers. Hee is working on a definitive bread book. Something to look forward to in the future.
Michael and Evan made their dough with 75 – 85% extraction whole grain flour (i.e., lightly sifted), water, salt, and sourdough, and formed it into balls before spreading out the dough with their fingers and baking small oblong loaves on the stones.
Michael piled the stones on one side of what he called a cast iron skillet, but I would consider it a cast iron griddle because it was rectangular shaped like my cast iron griddle. He heated the griddle and stones in the wood-fired oven until they reached 700 degrees (I think).
Then he carefully removed the griddle with the stones to a heat-resistant surface and baked the bread on top of the stones. He didn’t place the griddle back in the oven to bake the bread. Instead, he baked the loaves on the stones for a few minutes, then flipped them over and baked them on the other side. He was able to bake a few loaves before the stones lost too much heat.
When a couple of stones stuck to a loaf, Michael made up a funny quote: “You get a free stone with every loaf!”

Notes:
- I used Elizabeth’s formula for Wild Naan Sangak, but omitted the olive oil because Michael mentioned they don’t typically use olive oil in the Middle East, but they do use yogurt.
- I also omitted the sesame seeds because with the method I used, you flip the dough over to bake on the other side and that wouldn’t work with toppings.
- My dough is made with Maine Grains stone-ground lightly sifted whole wheat flour.
- I used 3 lbs. of river stones I got from a garden supply store. I think 5 lbs. or more stones would work better, but the package I bought only had 3 lbs.
- I tried the method Elizabeth provided (i.e., using water to press out the dough onto a baking sheet and then transferring the dough to another baking sheet with the hot stones), but I couldn’t seem to get the stones hot enough and to keep the dough from sticking to the original sheet pan.
- So, I improvised and used a cast iron skillet instead of a sheet pan. I would’ve used my cast iron griddle but it doesn’t fit in my oven. I liked this method because it was easier to manage the skillet and the dough.
- After the dough fermented at room temperature for about 3 hours, I placed it in the refrigerator overnight. The cold dough was much easier to work with the next day.
- I still had a little trouble getting the stones hot enough so I increased the temperature to 480 degrees and placed the skillet up another level in my oven. That seemed to do the trick. I was glad I had several dough pieces to practice with.
- More stones piled higher (not too high) would be better, but it still worked with the 3 lbs. If you have more stones, you can probably bake more than one bread in the skillet.
- I wanted to use my grill to bake this bread, but it was raining on bake day. I think the higher heat from the grill would get the stones hotter, but I haven’t tried it yet.

Equipment needed
- Cast iron skillet
- River rocks or stones – enough to fill at least a portion of the skillet (5 lbs. or so)
- Tongs – to flip the dough over and to remove any attached stones
- Oven or Grill
Preparing the stones for baking
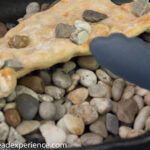
To prepare the stones before the first baking, wash them several times with dish detergent and warm water to remove oils and/or dirt. After several rinsings, once the rinsing water is clear, they will be almost ready to go. Just to be sure, boil the stones for 10 minutes in a pot of clean water.
After draining the stones, dump them onto a rimmed cookie sheet to dry. Once they are dry, they are ready to use.
Sometimes after baking, there are bits of bread stuck to one or two stones. To remove the bread, soak the stones in clean water. The bread will come right off.
When not using them for baking, let them cool, make sure they’re dry, and keep them in the jar or other container.

Slow Fermented Sangak – Persian Pebble Bread
- Yield: 5 Small Oblong Flatbreads 1x
Description
Sangak, also known as Persian Pebble Bread or Persian Army Bread, is a flatbread usually made with whole meal flour, and baked on a bed of hot stones.
Ingredients
Leavener
- dessert spoonful culture (whole wheat 100% hydration starter) from the fridge (about 40 grams)
- 50 grams (50ml) room temperature water
- 50 grams (100ml, or approx. 1/3 cup + 4 tsp) 100% whole wheat flour
Dough
- 320 grams (2.5 cups + 1 Tbsp) unbleached ‘no-additives’ all-purpose flour (I used lightly sifted stone-ground whole grain flour)
- 5 grams (2 tsp) wheat germ
- 180 grams (180ml, or 3/4 cup + 1/2 tsp) room temperature water
- 1 dessert-spoon (about 25 grams) plain yogurt
- All of the leavener from above
- 8 grams fine sea salt + 20 grams water (1.33 tsp table salt + 1 Tbsp. water)
Instructions
Leavener
- Late in the evening on the day before you will be making the sangak, put a spoonful of culture from the fridge into a small bowl. Recently fed starter works the best. Feeding it a couple of days before you plan to bake is fine.
- Stir in 50 grams water and 50 grams whole wheat flour. Cover and let rest at room temperature overnight. In hot weather, 6 hours seemed to work the best in my Southern kitchen. When I let it rest longer, the leavener started to sink.
Actual Dough
- On the day you will be making sangak, in a large bowl, add the flour. Whisk in wheat germ.
- Add 180 grams water, yogurt, and all of the leavener.
- Using a dough whisk or wooden spoon, stir just enough to mix it together.
- Cover and leave on counter for about 20 minutes.
Kneading and adding the salt:
- Whisk salt and 20 grams water into a small bowl and pour on top of the dough.
- Wash your hands and leave one hand wet. With the back of your hand against the side of the bowl, reach down into the bowl to the bottom of the dough and pull it up to the fold it over the top.
- Turn the bowl with your other hand and repeat as necessary until the salt is thoroughly incorporated.
- Gradually incorporate more water if the dough tears.
Proofing:
- Cover the bowl and let rest on the counter for 2-3 hours.
- Check the dough from time to time. Wet your hands and gently fold it whenever it has doubled.
Cold ferment:
- After the dough has rested for 2-3 hours, cover tightly with plastic wrap, and place in the refrigerator overnight.
Preheating the Stones:
- Put the cast iron skillet with the stones into the oven on the top middle shelf and set the oven to 450F. I found that increasing the temperature to 480F worked better for my oven.
Shaping:
- While the stones are preheating, remove the dough from the refrigerator.
- Lightly flour the work surface, and divide the dough into 5 equal pieces. My dough weighed 685 grams so each dough ball was 137 grams.
- Cover the dough balls and let rest until the oven and the stones have preheated sufficiently, about 45 minutes (with my oven).
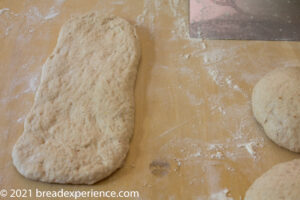
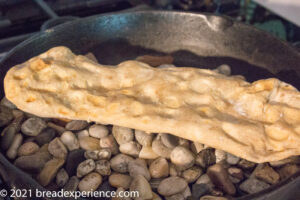
- Using lightly floured hands, work with one dough piece at a time so they don’t get too slack. With your fingers, press the dough ball out into a small oblong shape.
Baking:
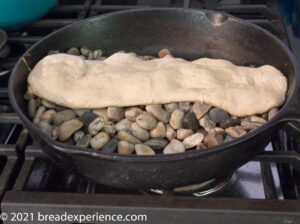
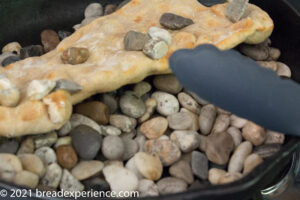
- Remove the cast iron skillet from the oven using heavy oven mitts and place it on a heat resistant surface. Remove the oblong dough piece from the counter using a dough scraper and gently place it on top of the stones. This should be done very quickly. If the dough doesn’t sit perfectly on the stones, just leave it, don’t try to rearrange it.
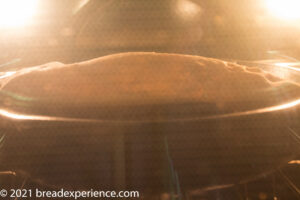
- Place the cast iron skillet back in the oven and bake the bread for 3-5 minutes on one side, then using blunt-nosed tongs, flip it over and bake another 3-5 minutes on the other side.
- Remove any pebbles that are stuck in the dough with the tongs. If the stones are extremely reluctant to release themselves, it seems to indicate that the bread has not quite finished baking; simply bake it a little longer and try again.
- You may find it easier to remove the skillet from the oven before flipping the bread over especially if you need to remove any pebbles from the dough. It should take about 8-10 minutes to bake each bread.
- Baking one loaf at a time, repeat the above steps. Let the oven and stones preheat between each bake. If you have enough stones to fill the skillet completely, you can probably bake more than one loaf; however, if you have too many stones, it will be really heavy.
Cool slightly
- Break the bread apart and serve it immediately with Persian stews, Indian-style curries, chili con carne, soup…. It’s good with grilled vegetables too. I served mine with Cauliflower and Chickpea Masala.
- Category: Flatbread

Who are the Bread Baking Babes?
We are a group of breadbakers who get together every month and bake bread! We have a Facebook group if you’d like to bake along. New recipes are posted every month on the 16th.
Elizabeth, of blog from OUR Kitchen, is the host kitchen this month. Check out her blog post for more details on how to participate in this month’s challenge.
For more inspiration, check out all of the BBB posts:
blog from OUR kitchen– Elizabeth (Host Kitchen)
A Messy Kitchen – Kelly
Bread Experience – Cathy
Karen’s Kitchen Stories – Karen
Judy’s Gross Eats – Judy
My Kitchen in Half Cups – Tanna
My Diverse Kitchen – Aparna
Thyme for Cooking – Katie (roundup)
Happy Baking!
Cathy
Elizabeth says
That is the coolest! I love the idea of using the cast-iron pan. We’ll have to try that in the winter when the barbecue is buried under mounds of snow!
Needless to say, your bread looks wonderful. As usual.
(Oops about saying to use olive oil! I wonder if they sometimes use butter.)
Cathy says
The workshop instructor said he was doing it the old school way. Of course, they wouldn’t have lugged around a wood-fired oven back then either. Not sure what my improvised method would be considered.
Kelly says
Yeah, that workshop sounds really fascinating! What a fun thing to attend.
Cathy says
The workshop was fun! Now I need to make some of the other flatbreads they demonstrated.
Elizabeth says
I guess they wouldn’t be hauling around stones either, but gathering them in whichever place the army camped.
I can’t wait to hear about the other flatbreads you learned about at the workshop.
Karen says
Great idea dividing the dough into smaller loaves. I bet the pan holds the heat better than a sheet pan too. Love the story about the Persian army.
Cathy says
The smaller loaves were much easier to handle for sure. The pan does hold heat better, but I still think I needed more stones.
Kelly says
Oh, the cast iron is a great idea! Much more consistent heat radiation.
Cathy says
I thought so too, but with my new oven you never can tell. Just have to test.
Tanna says
Cast iron! Marvelous idea. I have 2 cast iron smaller flat pans but gosh they’re pretty heavy and add the rocks, Not sure I could lift them 😃😂.
Amazing how the workshop came in with rock bread!
REALLY like the smaller loaves. This one was different.
Cathy says
You’re right about the cast iron skillet being heavy. Perhaps 3 lbs of rocks is all I needed. Otherwise, it might’ve been too heavy. I like the smaller loaves as well.
Katie Zeller says
Love the army story…. sounds so practical.
And I love the veggie stew (?) you are eating it with.
Cathy says
Cauliflower & Chickpea Masala is what I served with it. It was yummy!
Fateme says
Hey,
Iranian fellow here!
I’ve never baked Sangak (btw the name means little stones) since it’s easily accessible everywhere, but I’ve seen enough “Sangaki”s (Sangak bread baking shop. Iranian breads are baked in different shops, each called by the bread’s name.) and I don’t think the flipping would cause any problem with sesame seeds. They stick to the dough. Do try them cause they make it 10x better.
Cathy says
Hi Fateme, Thank you so much for the info! “Little stones” … I love that! I also love sesame seeds. I bet they do make this bread better.