
The process of making sourdough bread takes anywhere from 10 to 22 hours from start to finish, depending on how long you let the sponge and dough rest.
It is worth the time and effort involved. You just have to plan to fit it into your schedule.

Making Sourdough Breads revisited 3/7/2012
I revisited this bread last night. I used the same recipe and two different starters, but this time, I used a slightly different process. I’ve edited this post with the revised process and updated photos.
———————————————
I keep my starters in the refrigerator and feed them periodically, about every two weeks, unless I plan to make bread more often. I’ve had several starters over the past few years. My first starter was a descendant of one that began its life over 250 years ago. I prefer to use my own sourdough, so I let that one go.
I’ve created several starters from scratch. I created my first starter using the formula from Boudin Bakery. I still have that one and used it to make two of the loaves in this updated post.
More recently, I created an Apple Starter that I used to make the other two loaves featured in this post.
I couldn’t taste the difference between the two starters; however, the texture of the starters is different. The first one is more of a stiff levain, and the 2nd one would be considered a liquid levain. I like to keep them both alive and use them in my sourdough bread. They’re like little pets in my refrigerator.
Begin the process by feeding your sourdough starter
Don’t have a sourdough starter? Try one of these starter recipes
Use a stiff levain in this sourdough bread.
Try this starter from Boudin Bakery
- Up to 12 hours before beginning the recipe, stir the starter and discard* 1 cup.
- Feed the remaining starter with 1/2 cup of water and 1 cup of flour.
- Let it sit for 4 to 12 hours before using it in the bread.
OR
Use a liquid levain to make this bread.
Try this Apple Starter made from apples.
- Up to 12 hours before beginning the recipe, stir the starter and discard* 125g.
- Feed the remaining starter with 125g flour and 125g water or a 50/50 mix. (I use all-purpose flour and it works out well.)
- Let it sit for 4 to 12 hours before using it in bread.
*If you prefer to use the cup of starter instead of discarding it, feed it and follow the instructions for baking additional loaves. I tried this before and ended up with starters all over the place, and I was exhausted by the time I finished baking the bread. I think I made six or eight loaves one weekend. I wouldn’t recommend this because even though you’re not wasting the starter, you end up using more flour, not to mention energy. I had sourdough bread in my freezer for months.
Begin the process the evening before if you want the starter to be ready the next morning.
Here’s what the starter looks like after resting overnight.

Use the amount of “fed starter” the recipe calls for (see below), and feed the remaining starter according to the instructions above, depending on which starter you are using. Let the remaining starter sit at room temperature for 2 to 4 hours, until bubbly, and then cover and refrigerate.
Tip: If you’re not planning to use your starter for over a week, take it out and feed it once a week. Start by discarding (or using) 1 cup of the starter. After mixing in more flour and water, you can return the starter to the refrigerator without waiting for it to get bubbly first. (I usually let it sit on the counter for a couple of hours, even when I plan on returning it to the refrigerator, because it provides a better flavor for the next batch of bread).
For more tips on maintaining a sourdough starter, check out Creating a Sourdough Starter.

Making Sourdough Bread
Makes: 2 Loaves
Adapted from: King Arthur Flour’s method
I’ve used other recipes to make sourdough bread, but I like this one. It’s really easy!
Ingredients:
- 1 cup (~8-9 ounces / 227-255 grams) “fed” sourdough starter
- 1 1/2 cups (12 ounces) lukewarm water
- 5 to 6 cups (21 1/4 to 25 1/2 ounces / ~600 to 750 grams) All-purpose flour
- 1 tablespoon salt
- 1 tablespoon sugar (optional)
- Cornmeal to sprinkle on pans
Make the Sponge
Pour the cup of starter into a large mixing bowl. Add the warm water and about 3 cups of flour. Beat vigorously. Cover this sponge with plastic wrap and put it aside to work. This period can be very flexible, but allow at least 2 hours and up to 8 hours. A longer period (at a lower temperature) will result in a more sour flavor.
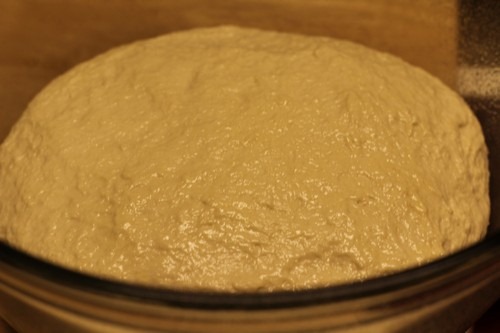
This is what the sponge looks like after it’s been working for 8 hours.

Mix, Knead Dough, Bulk Fermentation
After the dough has bubbled and expanded, remove the plastic wrap. Blend in the salt, sugar, and remaining 2 cups of flour. Mix until the dough comes together. Add only enough extra flour to keep the dough from sticking.
Tip: Once you’ve mixed the ingredients and the dough comes together, it’s best to let the dough rest for about 15 minutes (this is called autolyse). When you let the dough rest during the kneading process, you use less flour overall. Knead using your hands, an electric mixer, or a bread machine set on the dough cycle, until the dough is smooth and elastic.
Place the dough in the bowl, cover, and let it rise until doubled, 1 to 2 hours.
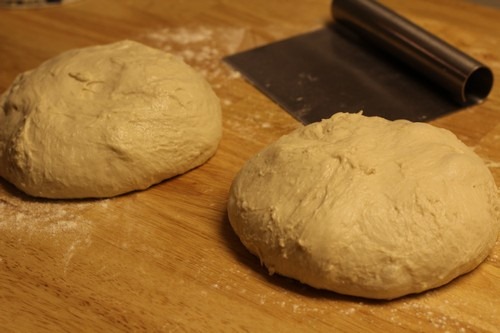
Shape the Loaves
Divide the dough in half. Shape each piece into a round and let it rest seam-side up on the counter for 10 minutes.
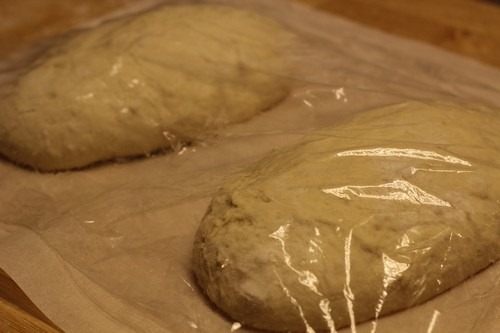
Shape each round into an oval loaf, and place on a lightly greased, cornmeal-sprinkled baking sheet. Cover, and let rise until doubled (this can take up to 2 hours).
Prepare the Oven for Hearth Baking
Prepare the oven for hearth baking by placing a baking stone on the middle rack of the oven and a steam pan underneath. Then preheat the oven to 450 degrees F.
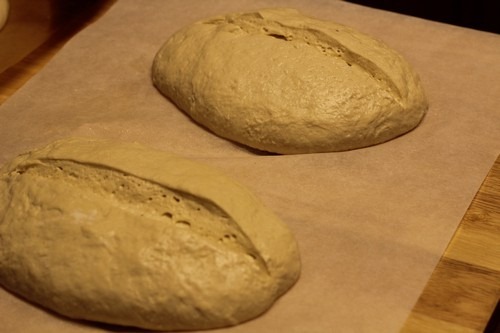
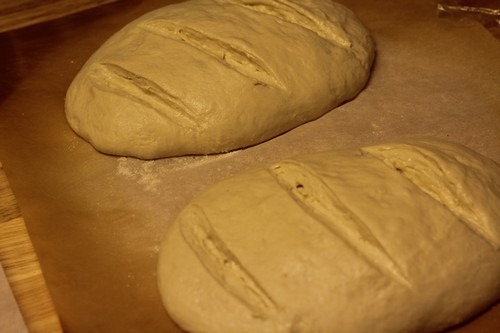
Score the Loaves
Remove the plastic wrap; score the tops of the loaves in the pattern of your choice.
Bake
Once the oven is preheated, slide the breads (on the parchment paper) directly onto the preheated baking stone and pour 1 cup of water into the steam pan. After 30 seconds, open the door, spray the walls with water, and close the door. Repeat twice more at 30-second intervals.
Bake the bread for 20-25 minutes. Check the breads during the bake cycle and rotate them 180 degrees for even baking if necessary. Continue baking until the breads are golden brown and sound hollow when tapped on the bottom.
Remove the loaves to a wire rack to cool completely (30 minutes to 1 hour) before slicing and serving.
These two loaves were made using the apple starter.

These two loaves were made with my original sourdough starter.

I liked both of the loaves. Here is a shot of the crumb. This bread is tasty. It’s chewy and sour, but it doesn’t taste too sour.

Happy Baking!
Cathy
Leave a Reply to run100s Cancel reply