
This post outlines the process for making a Sourdough Couronne Bordelaise Crown Bread, also known as a Bordeaux-style crown, with a medium hydration Pain de Campagne dough.
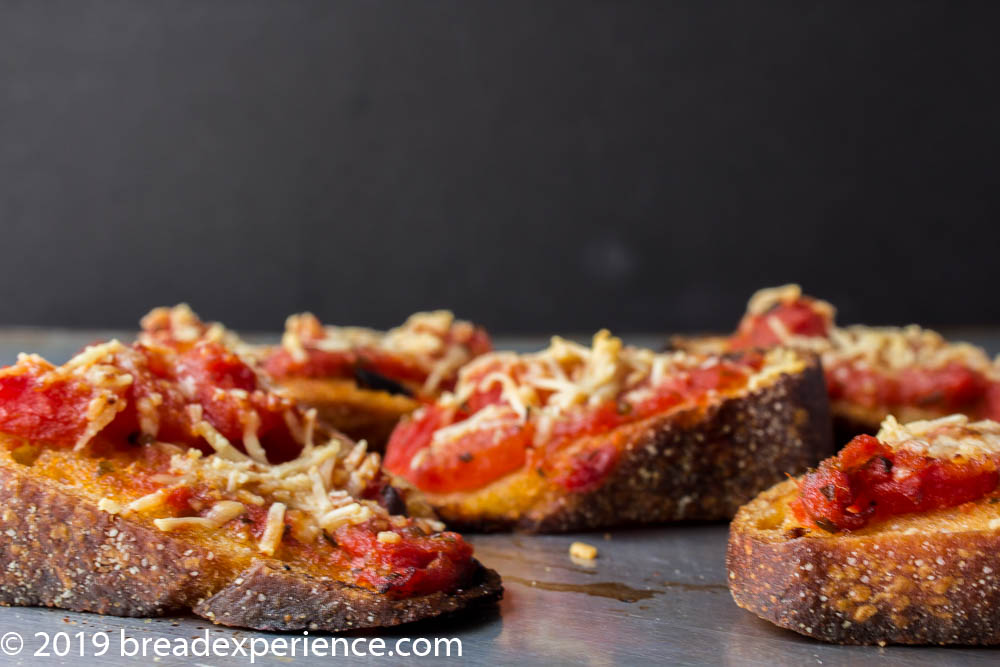
If you are looking for a relatively easy, centerpiece-worthy French bread to showcase at a special dinner with a friend (or two), might I suggest this Crown Bordelaise! This bread can be enjoyed as you would a French baguette, or for a real treat, toast slices and make brushetta.
The instructions in this post are for a loaf made completely with unbleached all-purpose flour.

Pain de Campagne dough is leavened using one of my favorite fermentation techniques – an overnight Pate Fermentee.
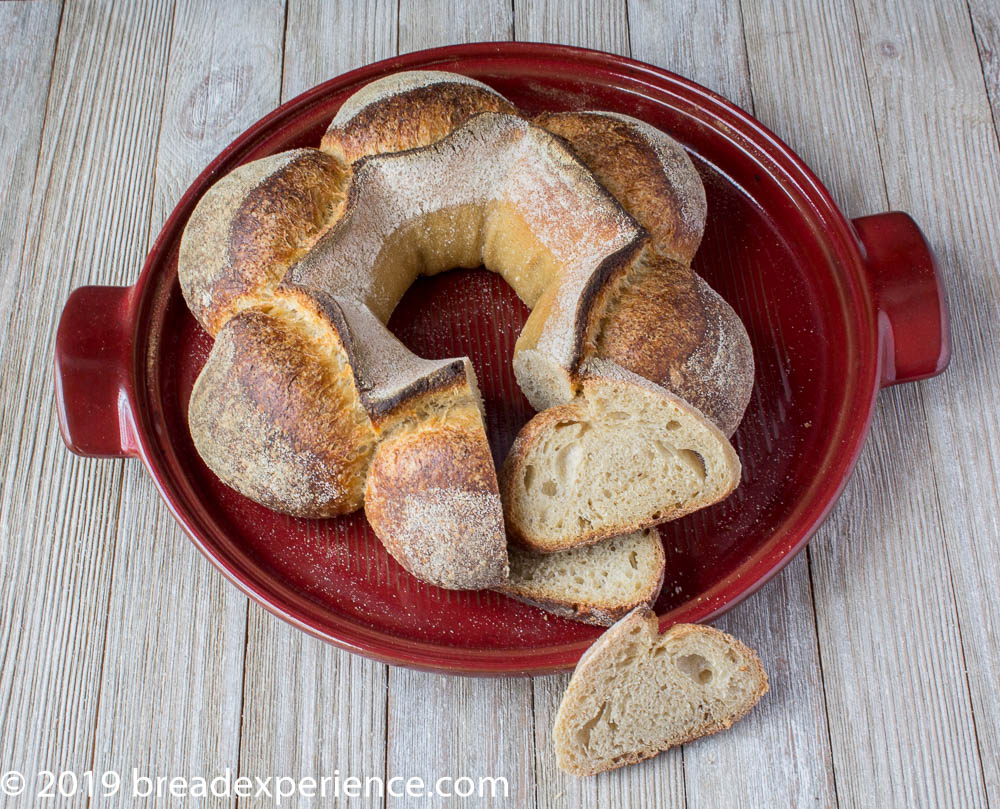
The preferment is made with sourdough instead of yeast and represents 64% of the total dough. It’s a fairly easy dough to work with, and if you let it ferment long enough, you’ll end up with a nice crumb structure with some lovely, but not too big, holes.

What type of flour should you use in this Sourdough Couronne Bordelaise Crown Bread?
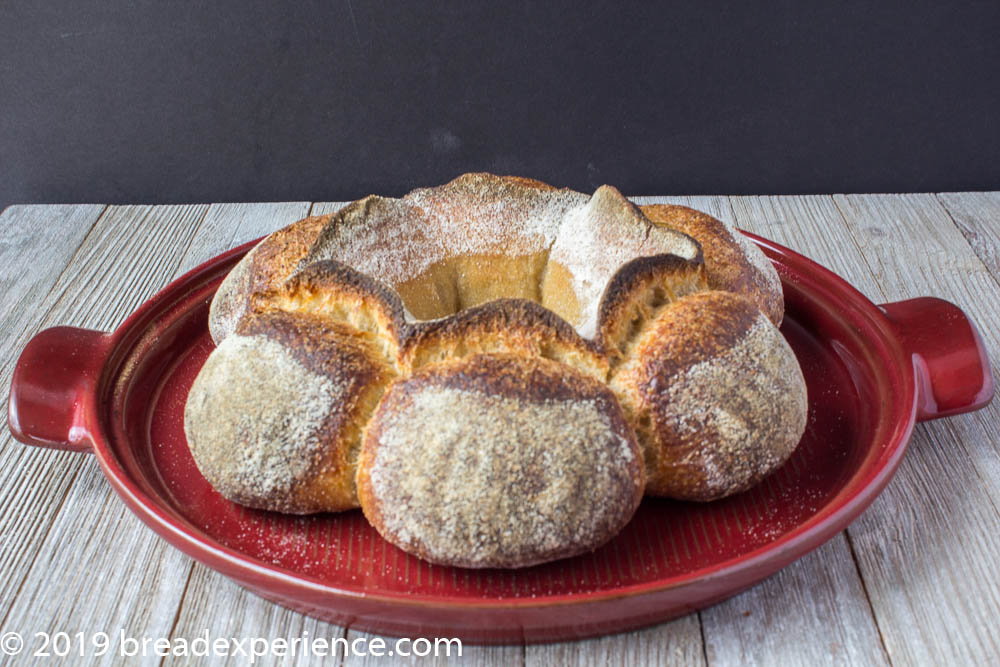
The loaf in the photo above was made with 100% all-purpose flour, but I also tested this bread with about 25% whole wheat flour.
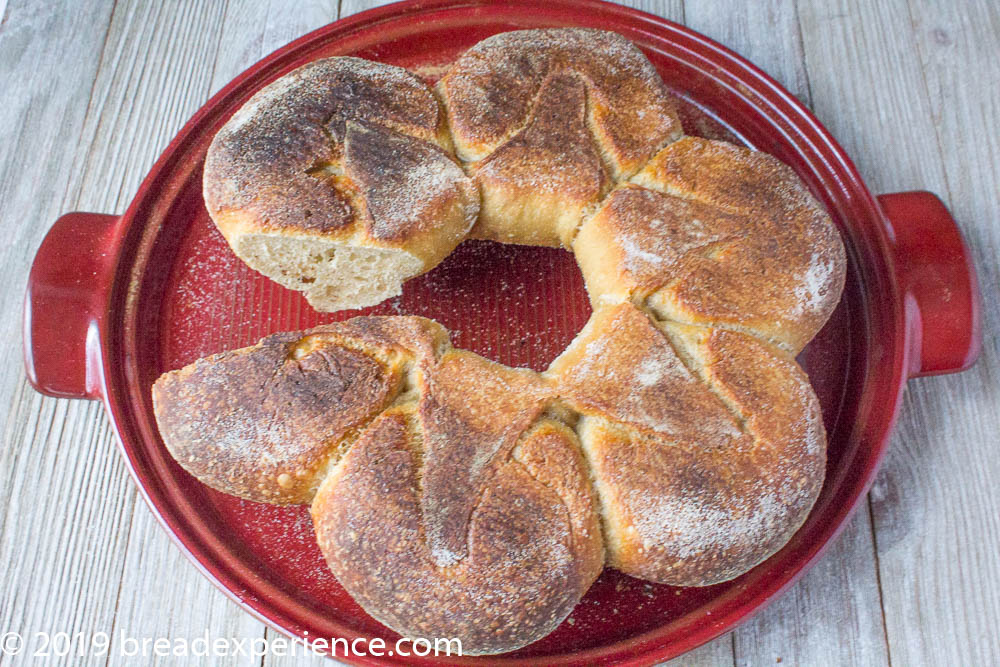
The whole wheat flour provides a nice flavor, but makes for a slightly denser loaf. Even so, as you can see in the photo below, it still has some nice holes.
My tips for incorporating whole wheat flour in this couronne loaf:
- To keep the bread from being too dense, only add 25% or less whole wheat
- Increase the hydration because whole wheat absorbs more water than all-purpose flour
- Let the dough ferment longer during the bulk fermentation
Since the Pate Fermentee represents such a high percentage of the overall weight of the total dough, adding the whole wheat flour with the all-purpose in the overnight preferment helps, but I found that allowing the final dough to ferment longer (even overnight in the refrigerator) helped as well.
Equipment I used to make this Sourdough Couronne Bordelaise Crown Bread
I shaped, then proofed the loaf in a couronne proofing basket with a removable liner. The removable liner, heavily dusted with flour, made for easier release of the shaped crown from the basket.

I baked the crown in a ceramic bread cloche, but you can use any bread cloche.
Using a preheated cloche helps achieve the crusty outside of the loaf and provides enough oven spring for the collar to pop up during baking.
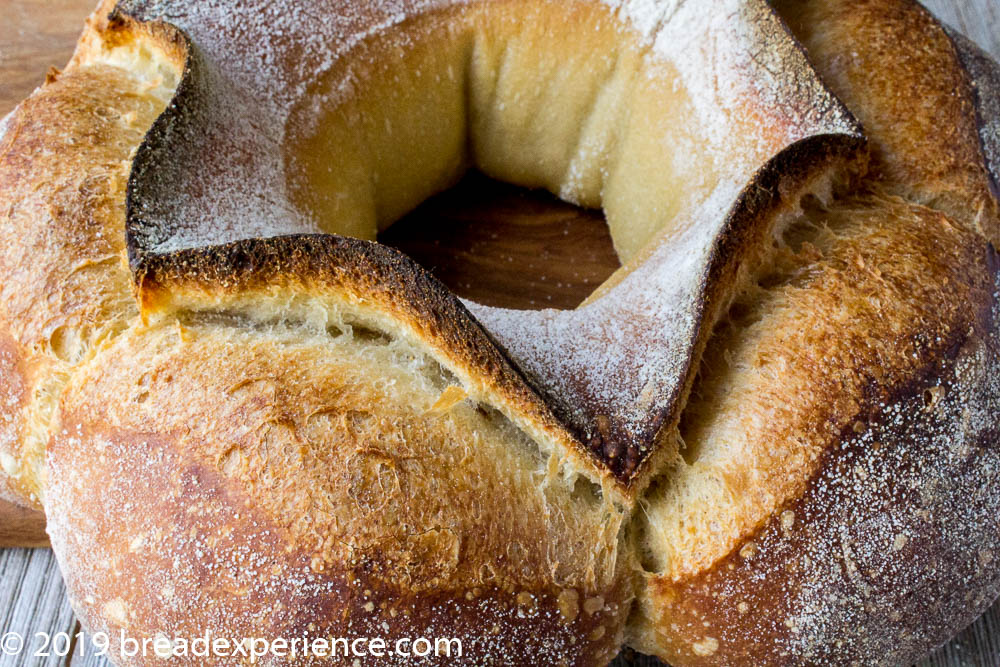
I used a straight-edge lame to cut the 6 points that are folded back over the dough balls. However, a sharp knife will work for this purpose as well.

I made brushetta with this bread. I baked the crown a few days ahead of time, and on the day I planned to serve it, I sliced the loaf, spread the slices with Brushetta, and then baked them in a 350- degrees F. oven until crispy.

Sourdough Couronne Bordelaise Crown Bread Formula
Makes: 1 Crown Loaf
To make one couronne of 11″ – 12″ in diameter, you need about 750 grams of dough.
I took my favorite Pain de Campagne dough and adjusted the formula to fit the basket. The resulting recipe makes 785 grams of dough that fits nicely in an 11.5″ Couronne basket. If you have a recipe for a medium hydration dough that makes 800 grams of dough, that would probably work fine for this bread as well.
Pate Fermentee:
- 300 grams all-purpose flour
- 210 grams water
- 25 grams sourdough starter (100% hydration), fed and active*
- 3/4 tsp fine sea salt
*100% hydration means the starter is fed with 50% flour and 50% water.
Evening of the first day:
In a medium bowl, add the sourdough and mix in the water. In a separate bowl, whisk together the flour and salt. Mix the flour mixture with the sourdough and incorporate thoroughly using a Danish dough whisk or wooden spoon. Adjust the flour or water as necessary to make a dough that isn’t too sticky or stiff.
Transfer the dough ball to a work surface dusted with flour. Knead the dough until it is soft and pliable, and tacky, but not sticky.
Cover the bowl with plastic wrap or a plate. Ferment at room temperature for 1-2 hours. The dough should swell to about 1 1/2 times its original size. Remove the dough from the bowl and degas by kneading gently. Return the dough to the bowl and cover tightly with plastic wrap. Place in the refrigerator overnight or up to 3 days. Or, freeze in an airtight freezer bag for up to 3 months.
Final Dough:
- 180 grams all-purpose flour
- 100 grams water
- 1/2 tsp fine sea salt
The next day, remove the Pâte fermentée from the refrigerator. Cut it into 10 – 12 small pieces using a bench knife or serrated knife. Place the pieces in the bowl of a stand mixer and allow them to warm up for about 1 hour.
In a separate bowl, whisk together the flour and salt.
Add the water to the Pâte fermentée and mix on low speed to break up the pieces. Gradually add in the dry ingredients and continue mixing on low speed until everything comes together to form a coarse ball. Add extra water if necessary to form a soft and pliable dough.
Mix on medium speed using the dough hook and adjust with flour if necessary to make a soft, pliable dough that is tacky but not sticky.
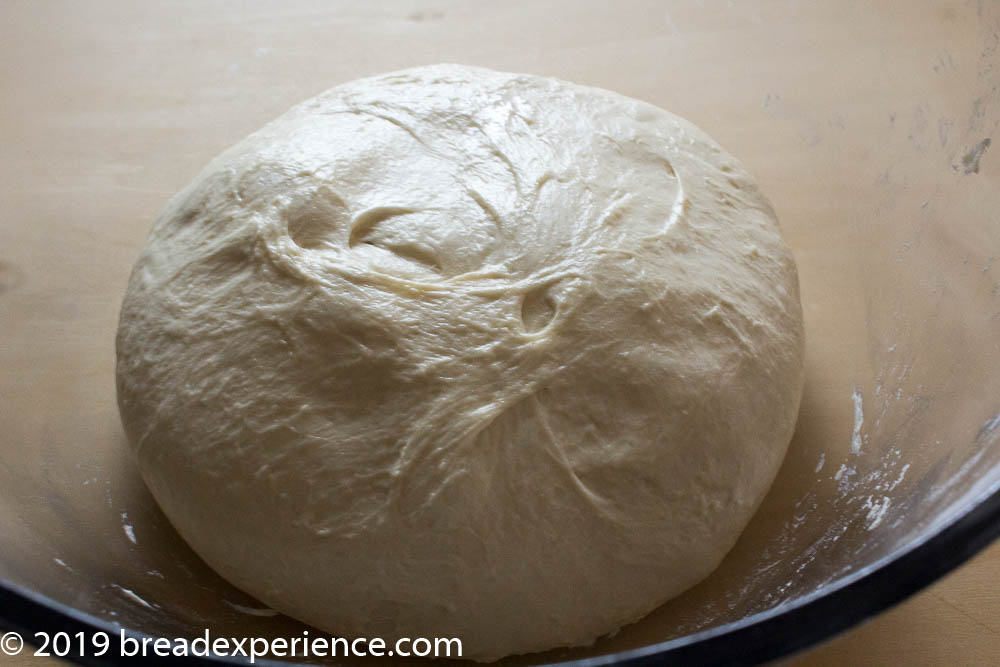
Transfer the dough to a clean large bowl and cover with plastic wrap, a kitchen towel, or a plate.
Let the dough ferment at room temperature for 3-4 hours, depending on the temperature in your kitchen. If it’s warm, it may only take 2-3 hours. Stretch and fold the dough after the 1st, 2nd, and 3rd hour, then let it rest for the final hour.
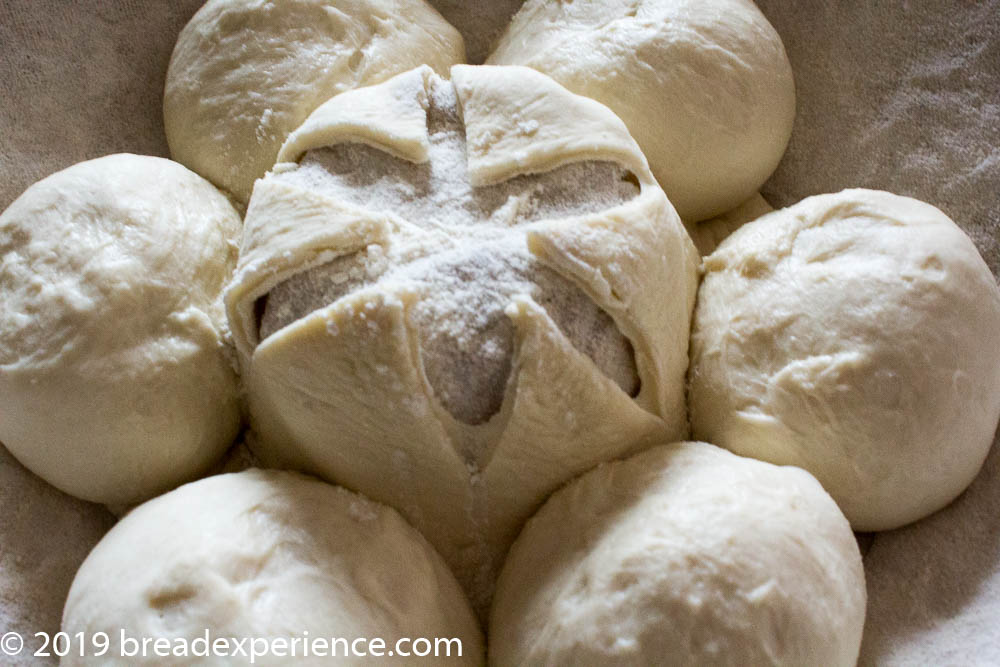
Shaping the Couronne (refer to photo tutorial at the end of the post)
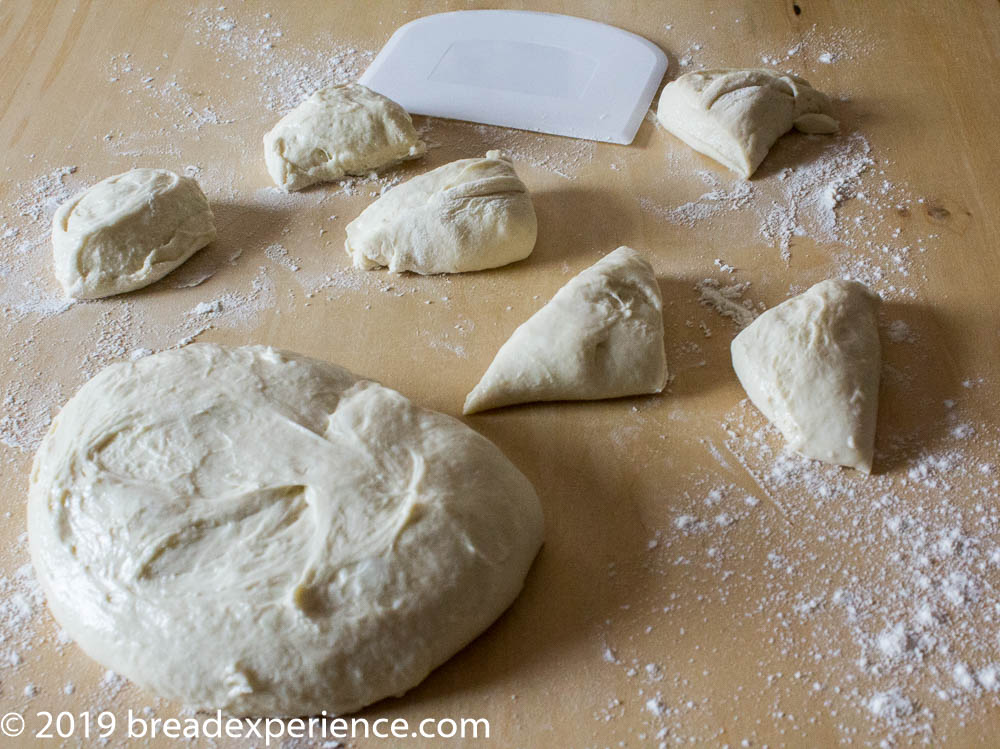
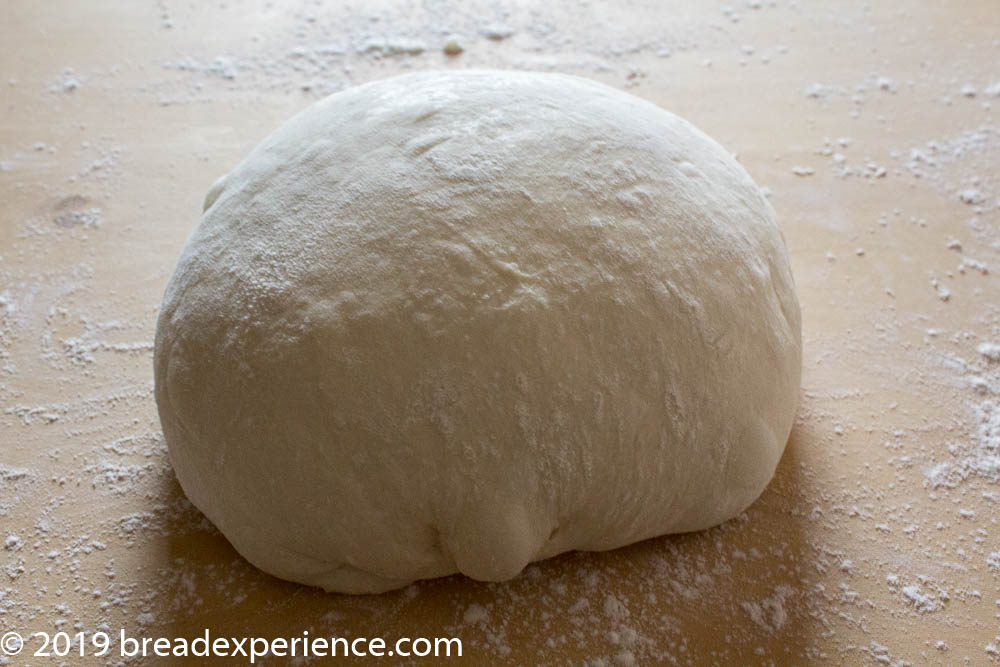
Remove the dough to a work surface dusted with flour. The final weight of your dough should be 785 grams.
Divide the dough into six pieces of 105-106 grams each, and one piece of 150 grams. Shape the pieces lightly into balls and let them rest, covered, for about 20 minutes.
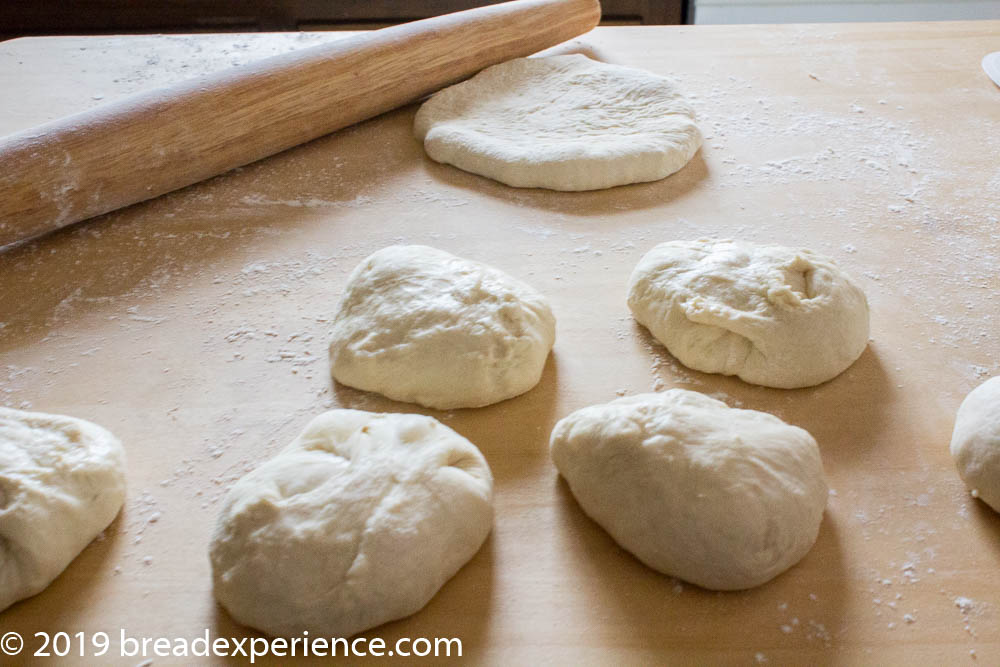
Heavily flour the liner of your proofing basket.
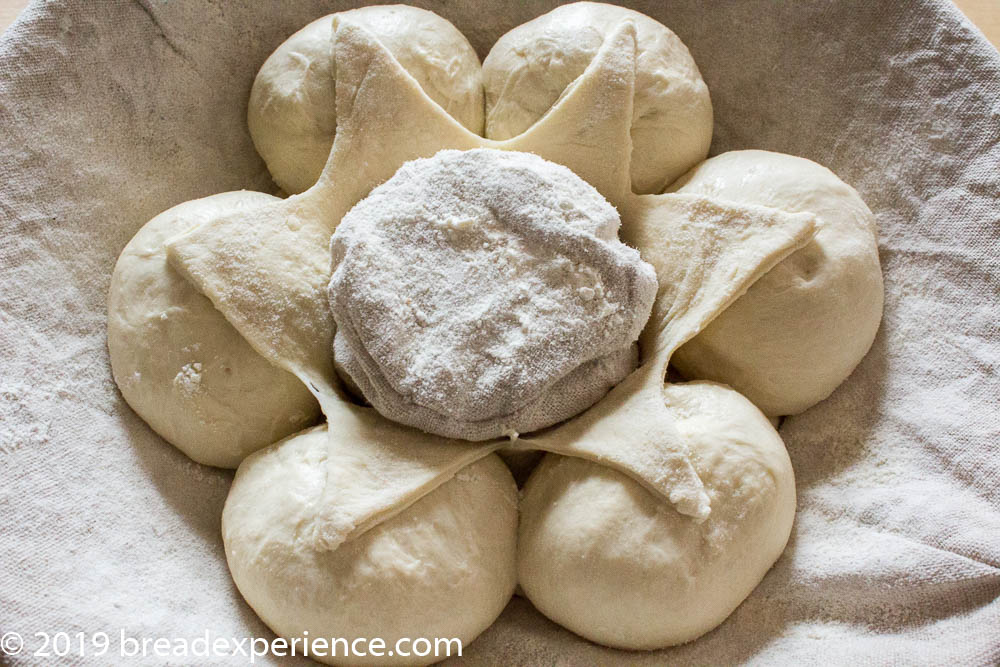
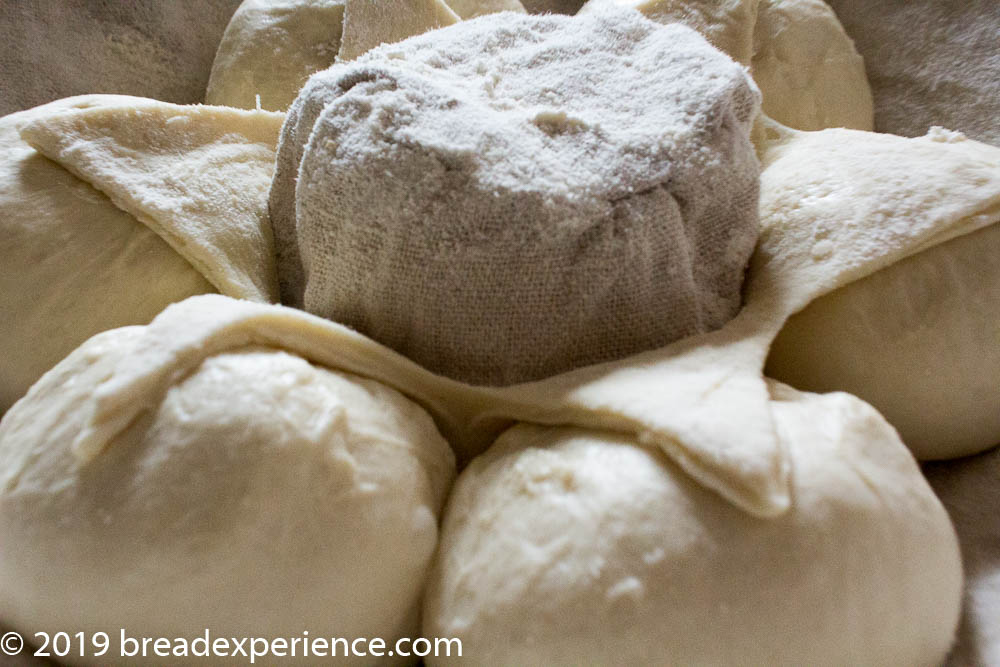
Roll the 150-gram ball into a flat disk about 10″ in diameter. Drape it evenly over the center hump in your basket. It should reach about halfway to the basket’s outside wall. The dough kept snapping back while I was rolling it out and when I draped it over the hump so my disk wasn’t as even as it could’ve been.
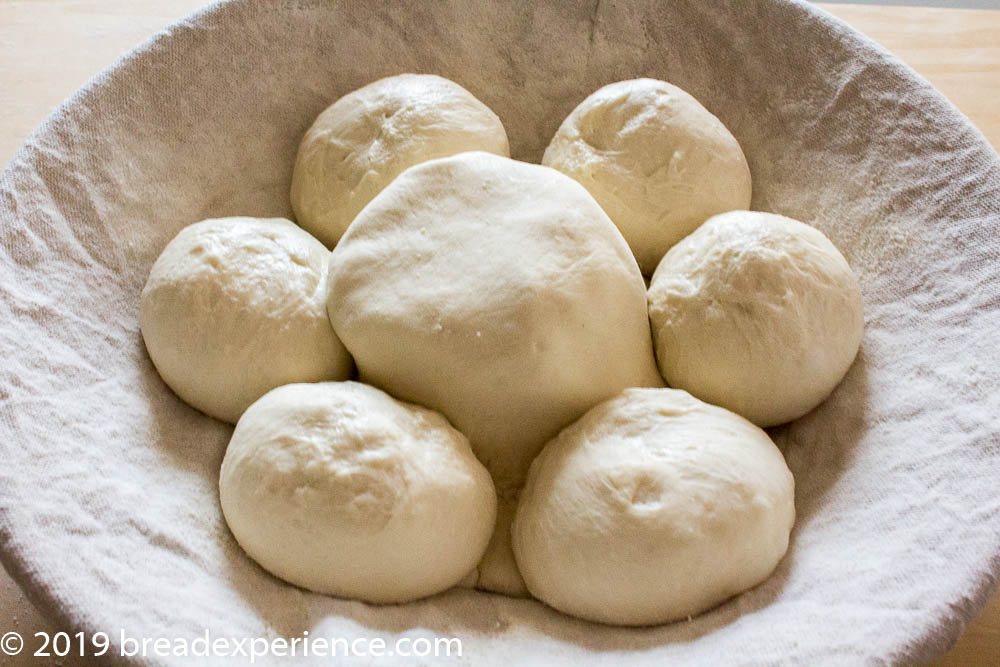
Shape the remaining six pieces into tight balls. Place them seam side up in the basket, evenly spaced. They won’t touch each other at this point.
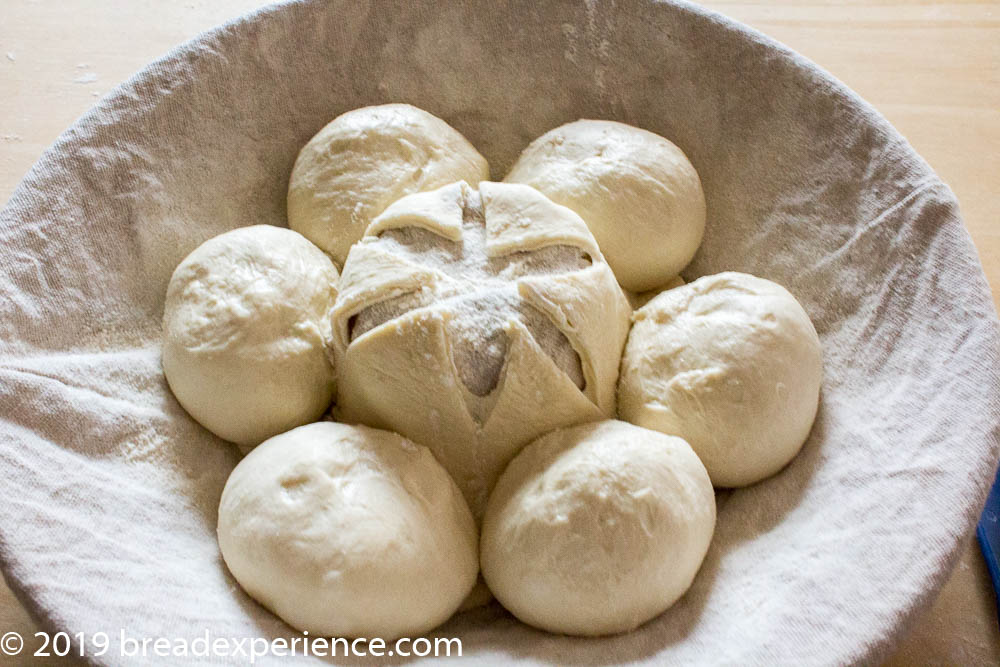
With a bread lame or sharp knife, cut the center of the disc so that it has six points centered over the six balls. Fold each point back over its corresponding dough ball. Refer to the photo tutorial at the end.
Proof the loaf for 2 hours at warm room temperature and bake as directed below. Optionally, after 2 hours, cover the basket tightly with plastic wrap and place it in the refrigerator overnight.
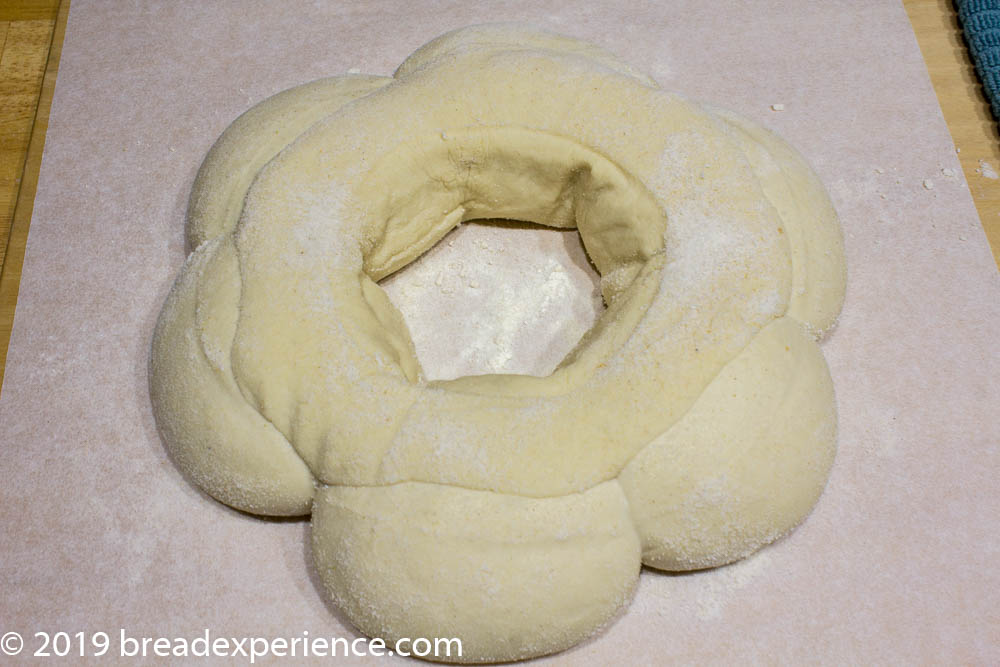
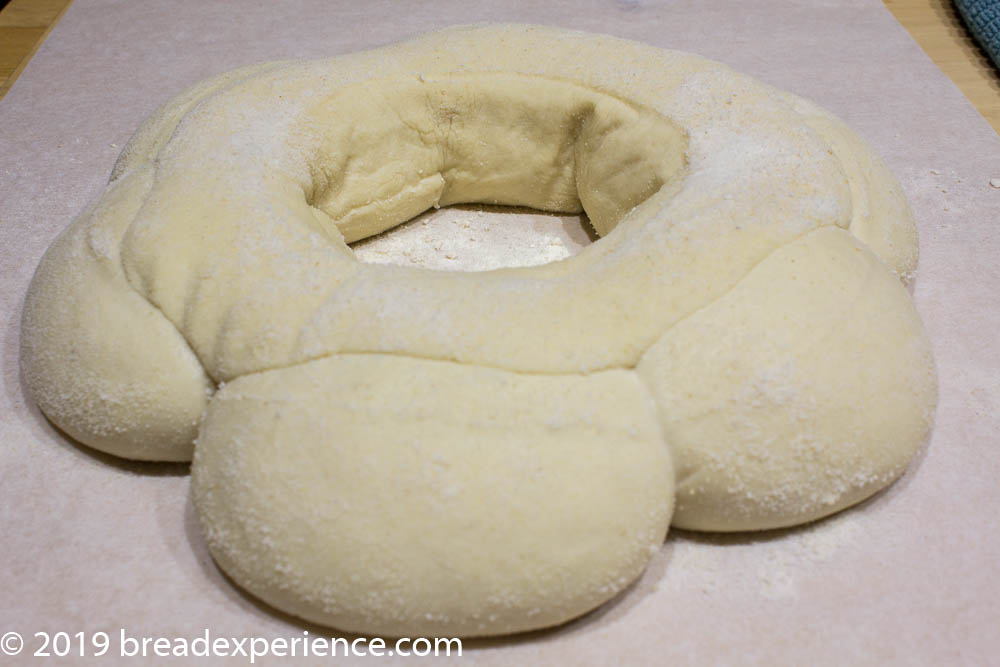
When the dough is fully proofed, it should have expanded sufficiently so that the balls are touching and you have a cohesive loaf. When it’s time to bake, invert the loaf onto a piece of parchment paper. This will be your “parchment sling” for transferring to the preheated cloche.
The “collar” will look like it has glued itself to the balls, but it should pop up during baking. No slashing required!
Prepare the oven and cloche for baking
1 hour before you are ready to bake the loaf, place a bread cloche on the middle rack of your oven. Preheat the oven and cloche to 450 degrees. I found that the longer I preheated the cloche for this bread, the better the collar popped up during baking.
Remove the cloche from the oven and place the lid and base on a pot holder or heavy towel to protect the surface and the cloche from cracking due to extreme temperature change.
Carefully transfer the bread crown (on the parchment paper) to the base of the cloche. Place the base in the oven and cover with the domed lid.
Bake the loaf for 15-20 minutes with the lid on and 10-15 minutes with the lid off. Watch the loaf to make sure it doesn’t get done too quickly. Because the couronne has a greater surface area, it may not take as long as other breads (boules or batards) of the same weight.
Remove the loaf to a wire rack to cool! Then slice and enjoy!
Photo Tutorial – Shaping a Sourdough Couronne Bordelaise Crown Bread


Happy Baking!
Cathy
Leave a Reply