
Originally published May 2012. Updated May 2026 with improved formatting and recipe card.
This Shepherds Bread is made with simple ingredients and baked in a conventional oven using a bread pot, Dutch oven, or bread cloche.

There’s something very comforting about a simple loaf of bread made with simple ingredients. This Shepherd’s Bread is one of those simple breads that’s a pleasure to make and soothing to eat. It reminds me of simpler times.
Karen of Bake My Day is hosting the Bread Baking Babes (BBB) and Friends this month, and she chose a comfy bread for the monthly bake.
What is Shepherds Bread?
Shepherd’s Bread is similar to Basque Bread, which originated in the Basque region of Spain. The Basque sheepherders traditionally bake this bread in a cast-iron Dutch oven in a pit in the ground.
I think this would be a great bread to take camping and bake in a cast-iron Dutch oven over a fire.
However, if you prefer a more conventional method, shepherd’s Bread can also be baked above ground in the comfort of your own home.
There are several options for baking this loaf in your home oven. You can bake it in a clay baker, bread cloche, bread dome, Dutch oven, or other baking pot, or bake it freeform on a baking stone.
Although I have a cast-iron Dutch oven, I opted to make this bread in my stoneware Bread Dome. I was pleased with the results.

This is a very versatile recipe. Karen of Bake My Day made an all-white flour version, one with a white flour and rye sponge, and another version with amaranth and white flour in the sponge and the final dough.
You can substitute the flours, just bear in mind the ratios of half whole wheat (or rye or other grain) and half white bread flour for the sponge, and about 25% to 30% whole wheat/other grain to bread flour in the final dough.
Adapted from: Bread for all Seasons by Beth Hensperger
The original recipe yields a huge loaf, so I halved it and reduced the sugar. I substituted white whole wheat for some of the bread flour in the dough, but not the sponge. For the dough, the ratio of white whole wheat to bread flour was about 31%, but overall, it was about 24% white whole wheat.
I baked this bread in a stoneware Bread Dome. If you prefer to use a baking stone or tiles instead of a baking pot, refer to Karen’s post for some helpful tips.
Print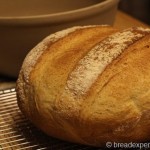
Shepherds Bread Baked in a Pot
- Yield: One 2-pound loaf 1x
Description
This Shepherd’s Bread is made with simple ingredients and baked in a conventional oven using a bread pot, Dutch oven, or bread cloche.
Ingredients
Sponge (takes about 2 hours)
1 tsp. active dry yeast
1 cup warm water
1 cup unbleached all-purpose or bread flour
1/8 cup sugar (add more sugar if you want a sweeter bread)
Dough (first rise about 2-3 hours; second only 15 minutes)
1/2 tsp. active dry yeast
1/2 cup warm water
1 1/2 tsp. salt
1/4 cup olive oil
1 cup white whole wheat flour
2 cups unbleached bread flour
1/4 cup extra bread flour for kneading
Instructions
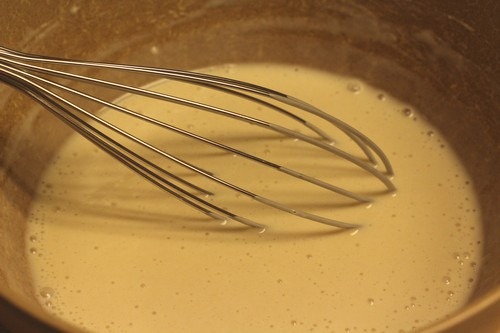
1) Prepare the sponge
In a large bowl, sprinkle the dry yeast over the warm water. Using a large whisk, add 1/2 cup of the flour and the sugar. Add the remaining 1/2 cup of flour and beat hard until very smooth, 2 minutes.
Scrape down the sides of the bowl and cover with plastic wrap. Let stand at room temp until soft, spongy, and pleasantly fermented, about 2 hours.
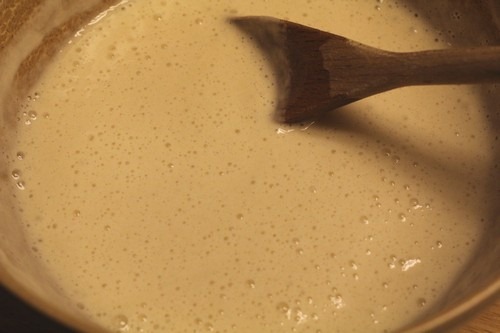
2) Prepare the dough
Using a wooden spoon, beat down the sponge. In a measuring cup or small bowl, stir the yeast into the warm water to dissolve. Add the yeast, warm water, salt, and olive oil to the sponge and beat well. Add the flour, 1/2 cup at a time, beating vigorously until a soft dough is formed that just clears the sides of the bowl.
3) Knead the Dough
Turn out the dough onto a floured work surface and knead for about 5 minutes until a smooth dough is formed. It should be firm yet springy and resilient. Only add about 1 Tbs. flour at a time to prevent sticking.
Place the dough in a floured (or oiled) deep container, dust the top with flour, and cover with plastic wrap. Let rise at cool room temp until tripled in bulk, 2.5 – 3 hours.
4) Shaping
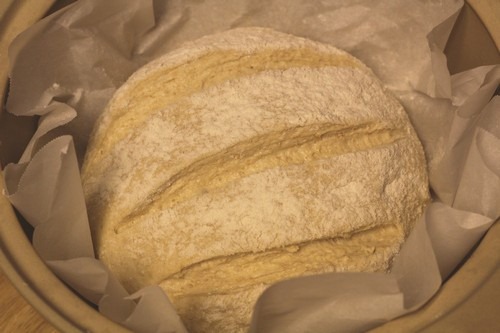
Turn out the dough onto a clean surface. It will be slightly sticky from the long rise. Knead in about 1/4 cup more flour to make a firmer dough, about 1 minute. Shape into a tight round ball. Pull the ends tightly to the center of the loaf to form a smooth bottom and sides. Transfer the dough to parchment paper for easy scoring and removal of the bread from the pot after baking. Mist the surface with water. Coat the top surface with flour.
5) Score the loaf / Final proof
Using a serrated knife or bread lame, slash the top of the loaf, no more than 1/4 inch deep, to allow steam to escape and allow room for the dough to expand.
Place the lid on the bread dome (or Dutch oven or clay baker) and let the dough proof for 15 to 30 minutes.
6) Bake the loaf
Preheat the oven to 425 degrees F. Remove the lid. Spritz the loaf with water and place the lid back on.
Bake the loaf for 10 minutes, then lower the thermostat to 400 degrees F and bake an additional 25-35 minutes. Remove the lid after 30 minutes to allow the loaf to brown thoroughly.
Remove the loaf from the pot and let it cool thoroughly before slicing and serving.
- Category: Bread
- Method: Yeast
- Cuisine: European


This is a great bread-and-butter bread. Supposedly, it’s best to eat it on the same day you bake it, but I didn’t try it until the next day, and it was great.
The crust was crispy after baking, but it softened up once it cooled. I enjoyed the texture and flavor of this simple Shepherd’s Bread.

This bread has been YeastSpotted. Please visit Wild Yeast to view all of the lovely breads in the roundup.
You should try this bread. Thanks to Karen for choosing this bread!

Happy Baking!
Cathy
Leave a Reply