The process of making sourdough bread takes anywhere from 10 to 22 hours from start to finish depending on how long you let the sponge and the dough work, but it is worth the time and effort involved. You just need to plan to fit it into your schedule.

Making Sourdough Breads revisited 3/7/2012
I revisited this bread last night. I used the same recipe and two different starters, but this time, I used a slightly different process. I’ve edited this post with the revised process and updated photos.
———————————————
I keep my starters in the refrigerator and feed them periodically – about every two weeks unless I plan to make bread more often. I’ve had several starters over the past few years. My first starter was a descendant of one that began its life over 250 years ago. I’ve since let that one go preferring instead to use my creations.
I’ve created several starters from scratch. I created my first starter using the formula from Boudin Bakery. I still have that one and used it to make two of the loaves in this updated post. More recently, I created an Apple Starter which I used to make the other two loaves featured in this post.
I couldn’t taste the difference between the two starters, however, the texture of the starters is different. The first one is more of a stiff levain and the 2nd one would be considered a liquid levain. I like to keep them both alive and use them in my sourdough bread. They’re like little pets in my refrigerator.
Begin the process by feeding your sourdough starter
Don’t have a sourdough starter? Try one of these starter recipes
Use a stiff levain in this sourdough bread.
Try this starter from Boudin Bakery
- Up to 12 hours before beginning the recipe, stir the starter and discard* 1 cup.
- Feed the remaining starter with 1/2 cup water and 1 cup flour.
- Let it sit for 4 to 12 hours before using in bread.
OR
Use a liquid levain to make this bread.
Try this Apple Starter made from apples.
- Up to 12 hours before beginning the recipe, stir the starter and discard* 125g.
- Feed the remaining starter with 125g flour and 125g water or a 50/50 mix. (I use all-purpose flour and it works out well.)
- Let it sit for 4 to 12 hours before using in bread.
*You can use the cup of starter instead of discarding it if you like, you’ll just need to feed it and follow the instructions for baking additional loaves. I tried this before and ended up with starters all over the place, and I was exhausted by the time I finished baking the bread. I think I made six or eight loaves one weekend. I wouldn’t recommend this because even though you’re not wasting the starter, you end up using more flour not to mention energy. I had sourdough bread in my freezer for months. My family didn’t mind though.
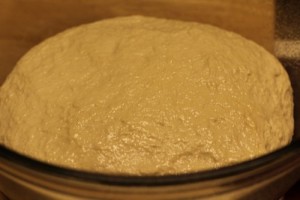
I started the process last night so the starter would be ready this morning. The starter has been resting on my counter all night. It produces a stronger flavor if you let it sit for a long time.
Here’s what the starter looks like at this point. See how bubbly it is!

Use the amount of “fed starter” the recipe calls for (below), and feed the remaining starter per the instructions above, depending on which starter you are using. Let the remaining starter sit at room temperature for 2 to 4 hours, until bubbly, then cover and refrigerate.
Tip: If you’re not planning to use your starter for over a week, take it out and feed it once a week. Start by discarding (or using) 1 cup of the starter. After mixing in more flour and water, you can return the starter to the refrigerator without waiting for it to get bubbly first. (I usually let it sit on the counter for a couple of hours even if I plan on returning it to the refrigerator because it gives it better flavor for the next batch of bread).
For more tips on maintaining a sourdough starter, check out Creating a Sourdough Starter.

Making Sourdough Bread
Makes: 2 Loaves
Adapted from: King Arthur Flour’s method
I’ve used other recipes to make sourdough bread, but I like this one. It’s really easy!
Ingredients:
- 1 cup (9 ounces) “fed” sourdough starter
- 1 1/2 cups (12 ounces) lukewarm water
- 5 to 6 cups (21 1/4 to 25 1/2 ounces) All-purpose flour
- 1 tablespoon salt
- 1 tablespoon sugar (optional)
-
cornmeal to sprinkle on pans
Make the Sponge
Pour the cup of starter into a large mixing bowl. Add the warm water and about 3 cups flour. Beat vigorously. Cover this sponge with plastic wrap and put it aside to work. This period can be very flexible, but allow at least 2 hours and up to 8 hours. A longer period (at a lower temperature) will result in a more sour flavor.

Mix, Knead Dough, Bulk Fermentation
After the dough has bubbled and expanded, remove the plastic wrap. Blend in the salt, sugar, and remaining 2 cups of flour. Mix until the dough comes together. Add only enough extra flour to keep the dough from sticking.
Tip: Once you’ve mixed the ingredients and the dough comes together, it’s best to let the dough rest for about 15 minutes (this is called autolyse). When you let the dough rest during the kneading process, you use less flour overall. Knead, using your hands, an electric mixer, or a bread machine set on the dough cycle, until the dough is smooth and elastic.
Place the dough in the bowl, cover, and let it rise until doubled, 1 to 2 hours.
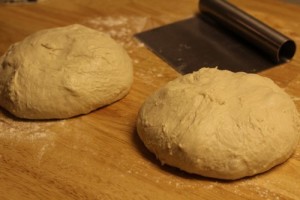
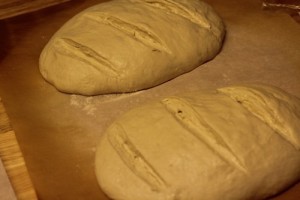
Shape the Loaves
Divide the dough in half. Shape each piece into a round and let rest seam-side up on the counter for 10 minutes.
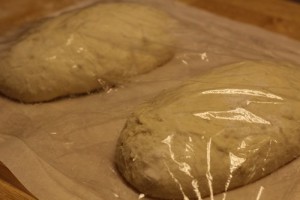
Shape each round into an oval loaf, and place on a lightly greased, cornmeal-sprinkled baking sheet. Cover, and let rise until doubled (this can take up to 2 hours).
Prepare the Oven for Hearth Baking
Prepare the oven for hearth baking by placing a baking stone on the middle rack of the oven and a steam pan underneath. Then preheat the oven to 450 degrees F.
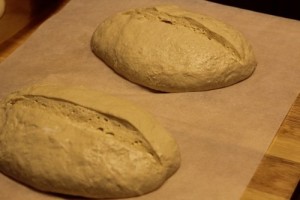
Score the Loaves
Remove the plastic wrap; score the tops of the loaves in the pattern of your choice.
Bake
Once the oven is preheated, slide the breads (on the parchment paper) directly onto the preheated baking stone and pour 1 cup of water in the steam pan. After 30 seconds, open the door, spray the walls with water, and close the door. Repeat twice more at 30-second intervals.
Bake the bread for 20 to 25 minutes. Check the breads during the bake cycle and rotate them 180 degrees for even baking if necessary. Continue baking until the breads are golden brown and sound hollow when tapped on the bottom.
Remove the loaves to a wire rack to cool completely (30 minutes to 1 hour) before slicing and serving.
These two loaves were made using the apple starter.

These two loaves were made with my original sourdough starter.

I liked both of the loaves. Here is a shot of the crumb. This bread is really tasty. It’s chewy and sour, but not too sour.

Happy Baking!
Cathy
prettycoolme209 says
You put 1 cup of starter at 9 oz. but one cup is 8 oz…….
Cathy (breadexperience) says
Hello, thanks for visiting my blog. The 9oz refers to the weight of the 1 cup of starter not the volume. It can be confusing.
Anonymous says
have made this a couple times. very good. however, i’m a bit confused about feeding the starter. i discarded the 1cup as instructed, then added 1/2 cup water and 1 cup flour……..my problem is that the starter gets thicker each time i do this. you say it should be the consistency of pancake batter. it starts out that way, but after feeding it 3-4 times, it is thick. what am i doing wrong?
Cathy (breadexperience) says
Hello, I’m so glad you like the bread. I see where the confusion is. I made this bread with 2 different types of starters – a stiff levain and a liquid levain. I didn’t specify the different feeding methods in this post so I’ve updated the post to include that information. The apple starter that I used would be more like pancake batter because it’s fed with 125g each of flour and water (or you can use 1 cup of each). The 1 cup of flour to 1/2 cup water would make a stiffer starter. Sorry for the confusion. Hope this helps.
Anonymous says
I’ve just finished baking two Classic Sourdough loaves after following your instructions on making a starter.
I found the instructions to be very clear and easy to follow, and everything turned out perfectly. The bread is delicious and I’ll certainly be making it again. Thank you!
Cathy (breadexperience) says
Thank you for your feedback! I’m glad the bread turned out well. Happy Baking!
kstrange says
This recipe results in such a tasty loaf of bread! Thank you for the recipe and very clear instructions & pics
Cathy (breadexperience) says
Thanks kstrange. I’m so glad you enjoyed it.
run100s says
Sounds great but i am a bit confused. you say preheat 450, add bread and bake(or do you add to cold oven) for 20, and do i understand that you take the bread out after 20 min then coo,l then return to oven for another 20-25 min? thanks!
Cathy Warner says
Sorry for the confusion. I edited out the duplicate instructions so it should be more clear now. Happy Baking! Let me know how it goes.
Rachael Fowler says
Making me hungry. This loaf looks delish! I am going to bake it with my new Sourdough International’s sourdough starter : )
Cathy W. says
Let me know how it turns out.
CHRIS YOUNG says
Cathy:
Many thanks for your recipes. I have tried your sourdough recipie 3 times now and believe I can replicate the same result over and over again. 8 would like to now add black olives and a few spices to the mix. When in the process would be a good time to add these ingredients without throwing a wrench into the end result. Appreciate your help here. Many thanks.
Chris from Canada
Cathy W. says
Hello Chris,
I’m so glad you enjoy making this bread. To incorporate dried spices, adding them with the dry ingredients should be fine. I would add the olives at the end of the mixing/kneading cycle after the gluten starts to develop a little bit. If the olives provide more liquid, you might need to adjust the hydration by adding more flour or reducing the amount of water used. Hope this helps.
Happy Baking!
Cathy
Bobby F says
Thanks for getting me started on sourdough! I have been looking for a recipe for this without yeast.
I did make the mistake of starting it at 11am & it was really ready by 9pm. but I didn’t have time to make at that time of night. So left it until the following morning. By then it had started to die out. So I just added some more flour & warm water, remix it & left it until 3pm. Then it was bubbling up nicely & I set it up to rise & baked it. Lovely!!
Thanks again!!!
Cathy says
Thanks for sharing your experience. I tend to run out of day myself. I’m glad your bread turned out well.
Lisa says
I have been playing with this recipe for a few weeks. Love the texture and flavour without using yeast. The only issue I have is with the shape. They go flat after I score them. I score them just before baking. Am I doing it wrong. Today, I will not score them and bake 1 loaf in bread machine and another in a loaf pan.
Thanks for a wonderful recipe and all the detailed instruction.
Lisa, former SF resident in Australia
Cathy says
Hi Lisa, I’m so glad you like this sourdough bread. Perhaps you are letting the shaped dough proof too long and that is why it’s deflating when scored. You might also try sprinkling just a bit of flour on top of the loaf before you score it so the tool doesn’t drag through the dough. Happy Baking!
Laura James says
Hello Cathy, just finished following along with your instructions. I didn’t want to use yeast packages or added sugar, so that I could only use a home made starter and yours was one of only two on the internet I could find that followed the ancient way of making the dough, because sugars are taken from the flour to be utilized from the bacteria and air born yeast without adding any.
Anyway, my bread turned out great and I will be making more and adding things like different types of flour and adding toasted seeds, olives during the final knead and fold process or doing oats or sesame on the surface to make artisan breads.
Thanks for posting this. This has been valuable for me to find a recipe that doesn’t try to cut the time in half by adding yeast packages. My choice is to try to be as self sufficient as possible when making foods at home.
Cathy says
Hi Laura, thanks for sharing your experience making sourdough bread. I’m so glad your bread turned out great. Using different flours and adding toasted seeds or sprinkling with oats or sesame seeds is a great idea. I made a sourdough loaf this weekend with sprouted wheat flour and toasted sunflower seeds. There are so many possibilities.
JenT says
Hi Cathy,
I began my break-making journey about a month ago with a sourdough starter. I’ve tried several different recipes and have had 8 failed loaves as a result. They were edible, but certainly not what I was going for.
Then I found your recipe. I tried it this past weekend and the bread came out so much better than my previous attempts. I still have some things that I can work on (the crumb and crust weren’t perfect), but my husband and daughter both agree that this is the best bread yet! Thank you for writing such clear instructions and filling me with some confidence in these early bread baking days. Can’t wait for next weekend!
Cathy says
Hi JenT,
Thank you for the feedback. I’m glad you are starting to see positive results and I’m delighted that my instructions helped. Practice makes perfect as they say so I do hope you’ll keep trying and let me know how it goes.
Happy Baking!
Cathy
Chris says
Hi Cathy,
Thanks for this recipe, this has helped me get closer than ever to a nice sourdough bread.
My starter (100% hydration start) was ready around 9pm last night, so i started the process and mixed in 1cup + 1.5cups water + 3cups flour. By morning (7am) it was similar to the image you have shown above.. albeit a little drier.. but it had grown considerably.
I have then mixed in 2cups more flour and left to rise in a bowl.. it did have some movement, but definately wasnt double after 2 hours.. i proceeded to shaping and have left for another 2 hours.. But since reshaping.. there is barely any growth.. I would say maybe 1.1 times its size since shaping.
Where am i going wrong here? The temp is around 20celcius.
I will proceed to cook one. and perhaps leave another for later on.. but is it my starter? maybe too much flour?
help!
Cathy says
Hi Chris, did you bake one of the loaves? How did it do? Your temperature sounds okay. I’m wondering if the starter wasn’t active enough.
Terri Roberts says
Hi Chris,
I keep my house on the cooler side also, I love this recipe. I have found that if I ignore the clock and just go by the dough itself it is great. I also invested in a scale you can get one for $8 easy . I bake this bread twice a week. I feed my starter to 9-10oz at night then in the morning I measure out 25oz of flour I use King Arthur and my 12 oz of water all weighed. Mix all but 2 1/4 cups of flour in to starter and let double. Before.. going on to next steps. I often don’t get to forming loves until 8pm so I form and put in fridge and they will rise slowly I take them out in the am and they finish rising on counter within 1-2 hours so I heat oven during last hour. I hope this helps.
Vicki says
Do you bake on the parchment paper or directly on the stone?
Cathy says
Hi Vicki, you can bake on the parchment or directly on the stone. I find it easier to bake it on the parchment and remove it partway through baking.
Vicki says
Also, how much starter are you feeding if you throw a cup away?
Cathy says
You don’t have to discard a whole cup. If you only have a cup of starter, you can discard 1/2 cup and feed it. You just need to keep a few tablespoons in order to keep it going.
Cali says
I messed this up a bit in my first attempt ever making bread. It was a little under done in the middle but it made the best croutons and the rest of the bread was perfect. Super happy with this recipe!
Cathy says
Hi Cali, I’m so glad you liked this bread and you’ve figured out how to use discarded bread on your first attempt. Way to go!