
Take a gallon of fine flour, and a pint of good new ale barm or yeast, and put it to the flour, with the whites of six new laid eggs well beaten in a dish …
Robert May, The Accomplisht Cook, 1685 (first published 1660)

The challenge for the Bread Baking Babes this month was to make Robert May’s ‘French Bread the best way’ from The Accomplisht Cook (1665-85). The adapted version is found in English Bread and Yeast Cookery by Elizabeth David.
I absolutely love bread history, and the thought of baking a bread recipe from 1660 was enough to get me going, but not so fast…
Ilva (Lucullian Delights), the host kitchen this month, decided that French bread would be too easy so she challenged us to get creative and add a motif or design on top of the loaf.
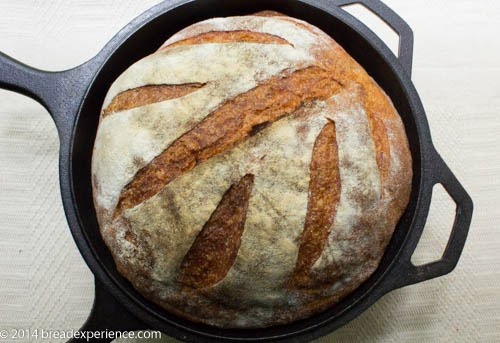
I opted to explore my creativity with a bread lame. This scoring pattern is based on a design I’ve been meaning to try for awhile. However, I changed it up a bit and added a couple of extra slashes for good measure.
My adapted version is made with KAMUT white and wheat flours and baked in a Dutch oven combo baker.

I’m pretty sure my bread doesn’t resemble the original bread from 1660 or the adapted version from 1977, but I like it anyway.
ROBERT MAY’S FRENCH BREAD From 1660
Adapted from Elizabeth David’s English Bread and Yeast Cookery
Ingredients:
- 500 g/ 1 lb 2 oz preferably a half-and-half mixture of unbleached white and whole wheat *
- 6 grams (1 3/4 tsp.) instant yeast
- 10g (1 3/4 tsp.) salt
- 2 large egg whites
- 100 grams (1/3 cup) milk, warm
- 250 grams (~ 1 cup) water **
* I used 250 grams KAMUT white flour & 250 grams of KAMUT whole grain flour
** I added about 20 grams (1 T) more water because KAMUT absorbs more water than regular flour.
Mix the dough:
Mix the flours, yeast and salt in a large mixing bowl. Beat the egg whites in a small bowl until they are just beginning to froth. Combine with the warm milk. Pour over the flour mixture and mix well.
Gradually add in the water, a little at a time, and mix using a Danish dough whisk or your hands. You may not need all of the water if you are using regular bread flour.
 |
 |
Autolyse:
After the dough is thoroughly incorporated, let it rest for 10-15 minutes. This is a wet dough so I used the fold-and-turn method in the bowl instead of trying to knead it.
Fold and Turn the Dough:
After the autolyse, perform a fold-and-turn in the bowl. With the fold-and-turn method, you basically do a series of turns and folds in the bowl to develop the gluten structure.
To perform a fold-and-turn, grab one edge of the dough, lift it up and place it over the top of the dough. Turn the bowl, and repeat this action 3 more times. This is considered one fold-and-turn.
Bulk Fermentation:
If you are using KAMUT, let the dough bulk ferment for about 1 & 1/2 to 2 hours. Fold the dough every 30 minutes for the 1st hour and then let it rest for the final 30 minutes to an hour. If you are using regular flour, you may not need as long of a bulk fermentation.
Shape the Loaf:
Remove the proofed dough from the bowl to a floured work surface. Shape it into a round loaf and let it rest on the counter for 10 minutes. Then reshape it into a tight round and place it in a lined banneton basket.
 |
 |
Final Proof:
Lightly flour the top of the dough. Cover the basket with plastic wrap or a kitchen towel. Let it proof about 30 – 45 minutes.
 |
 |
Prepare the Oven for Baking
45 minutes to an hour before baking the loaf, preheat the oven to 450 degrees F. Remove the middle rack from the oven and place a Dutch oven on the bottom rack. I used the Dutch oven combo baker for this bread.
Transfer the Loaf to the Dutch Oven
When the loaf is fully proofed and the oven is sufficiently preheated, carefully remove the Dutch oven using heavy oven mitts. Be careful not to burn your arms or hands on the sides of the oven or the pot. Gently invert the loaf from the proofing basket onto the bottom of the Dutch oven combo baker. I sprinkled the bottom of the combo baker with cornmeal before inverting the loaf onto it.
Score the Loaf:
Score the loaf using the pattern of your choice. As I mentioned, I used a new scoring pattern, but you can use what you like.

Bake the Loaf:
Place the Dutch Oven on the bottom rack of the oven and cover it with the lid. Bake the loaf for 20 minutes with the lid on.
Remove the lid and bake for an additional 20 minutes or until the loaf is a medium dark brown. Just be careful not to burn the bottom of the loaf.
 I’m sending this loaf to be yeastspotted.
Remove the loaf from the Dutch oven to a wire rack to cool completely before slicing and serving.

Check out how the other creative Babes handled this bread:
The Bread Baking Babes (current dozen) are:
- Bake My Day – Karen
- blog from OUR kitchen – Elizabeth
- Bread Experience – Cathy
- Feeding my Enthusiasms – Pat/Elle
- girlichef – Heather
- Life’s a Feast – Jamie
- Living in the Kitchen with Puppies – Natashya
- Lucullian Delights – Ilva
- My Diverse Kitchen – Aparna
- My Kitchen In Half Cups – Tanna
- Notitie Van Lien – Lien
- Thyme for Cooking – Katie (Bitchin’ Bread Baking Babe Bibliothécaire)
Would you like to be a Bread Baking Buddy? Here’s how:
Make Robert May’s French Bread, then email your link to Ilva, the kitchen of the month (or email your photo and a bit about your experience if you don’t have a blog). Refer to Ilva’s post for the details. Submissions are due by September 29th. Once you’ve posted, you’ll receive a Buddy badge for baking along, then watch for a roundup of all of the BBBuddies posts a few days after the close of submissions.
I hope you’ll join us this month in baking French Bread from the past.

Happy Baking!
Cathy
Leave a Reply